[개인 프로젝트] 밸런스 게임
git clone https://github.com/nyj001012/balance-game.git
프로젝트를 진행하게 된 계기
대규모 트래픽을 처리하면서 배포의 경험을 쌓으려면 뭐가 좋을까 생각하던 와중에 밸런스 게임이 생각났다.
같은 사람이 하나의 질문에 대한 답을 여러 번 클릭했을 때, 사람들이 몰린 상태에서 질문을 선택했을 때 등의 상황을 겪어볼 수 있을거라 생각한다.
그리고 인터페이스가 간단할 것 같았다.
개인적으로는 배포도 해보고 싶은 프로젝트이다.
프로젝트 환경
- Spring Boot 2.6.6
- H5 Database
- Thymeleaf
- IntelliJ Ultimate
프로젝트 진행 상황
1차, 2차, 3차 정도로 나눌 예정이다. 1차는 그냥 내가 아는 지식 선에서 깡으로 만들 예정이다. 2차는 1차에 대한 피드백 및 강의를 토대로 개선할 것이고, 3차 또한 2차의 개선으로 보면 될 것 같다. 추가적으로 대규모 트래픽 처리는 3차 정도에서 이루어지지 않을까 싶다.
1차
2022-04-09
git reset –hard 2a30f381b6ebaed8db6ae076b57639614d27227f
프로젝트 생성
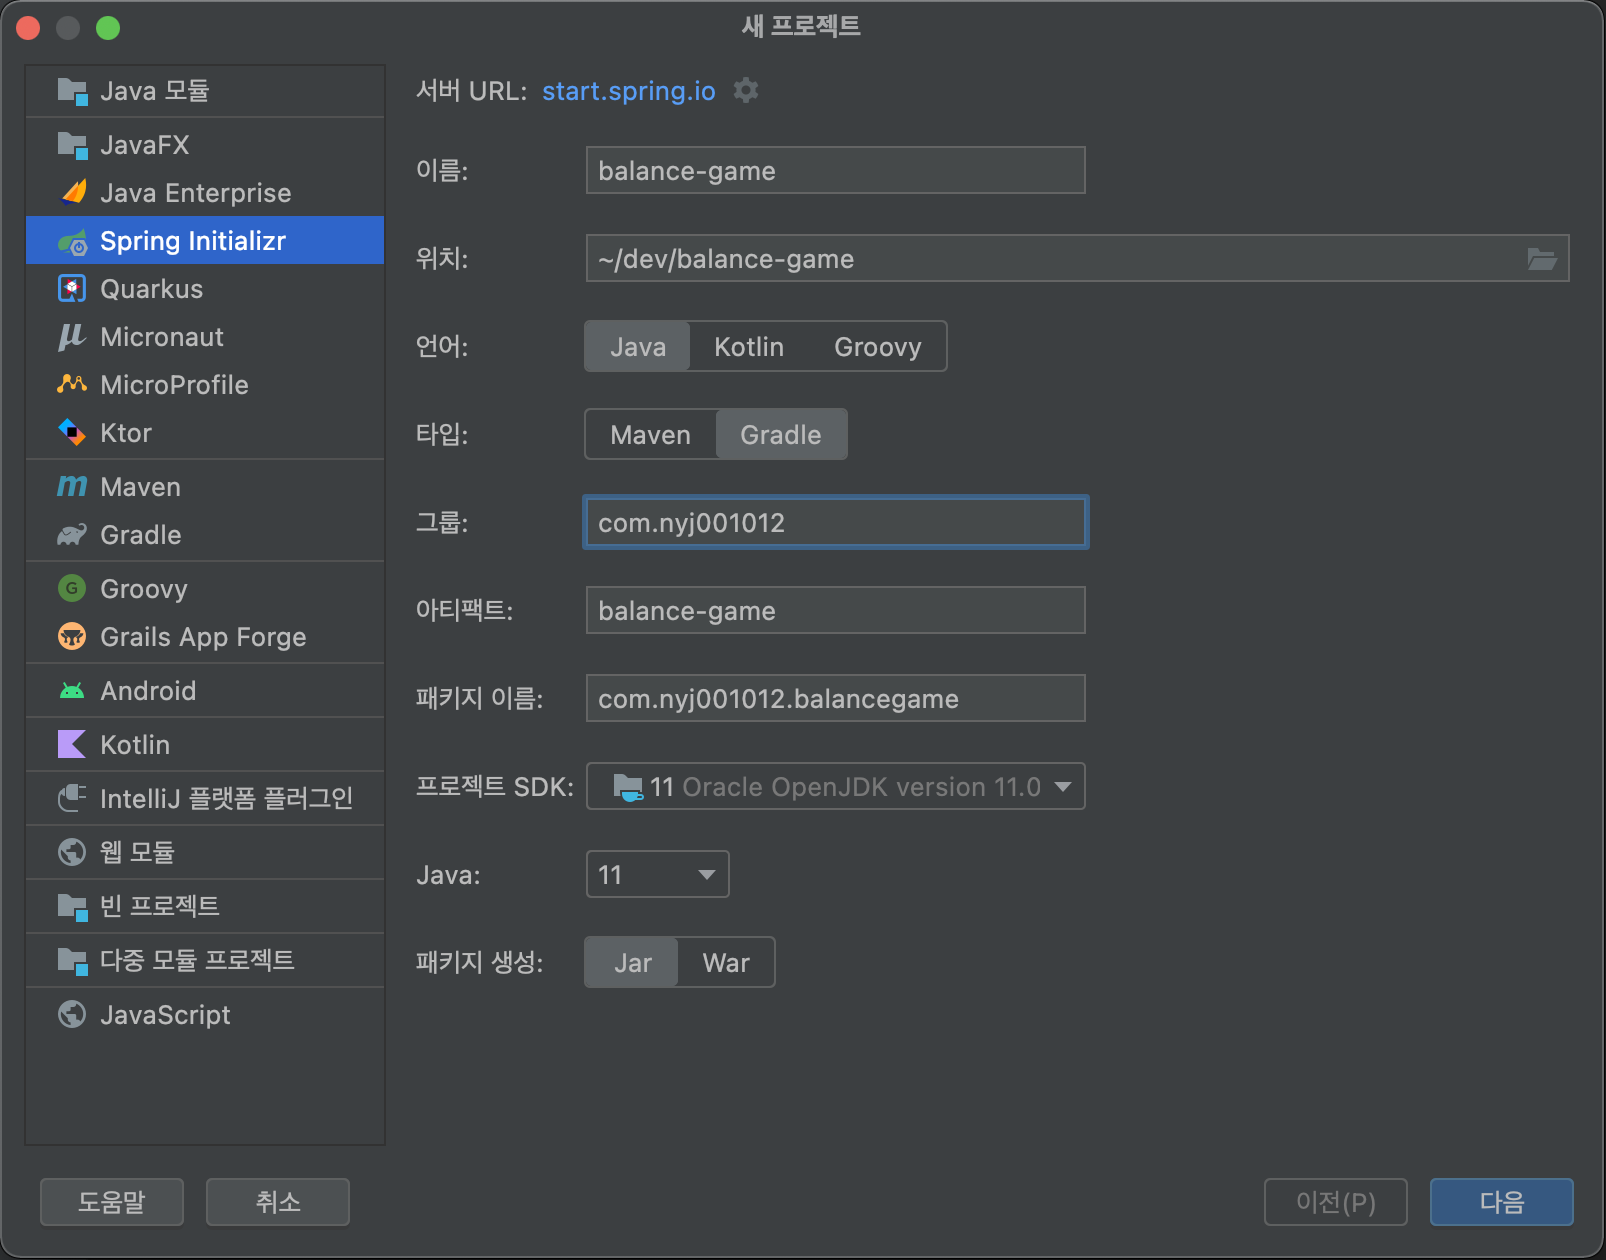
- 프로젝트 이름: balance-game
- 언어: Java (11)
- 빌드: Gradle
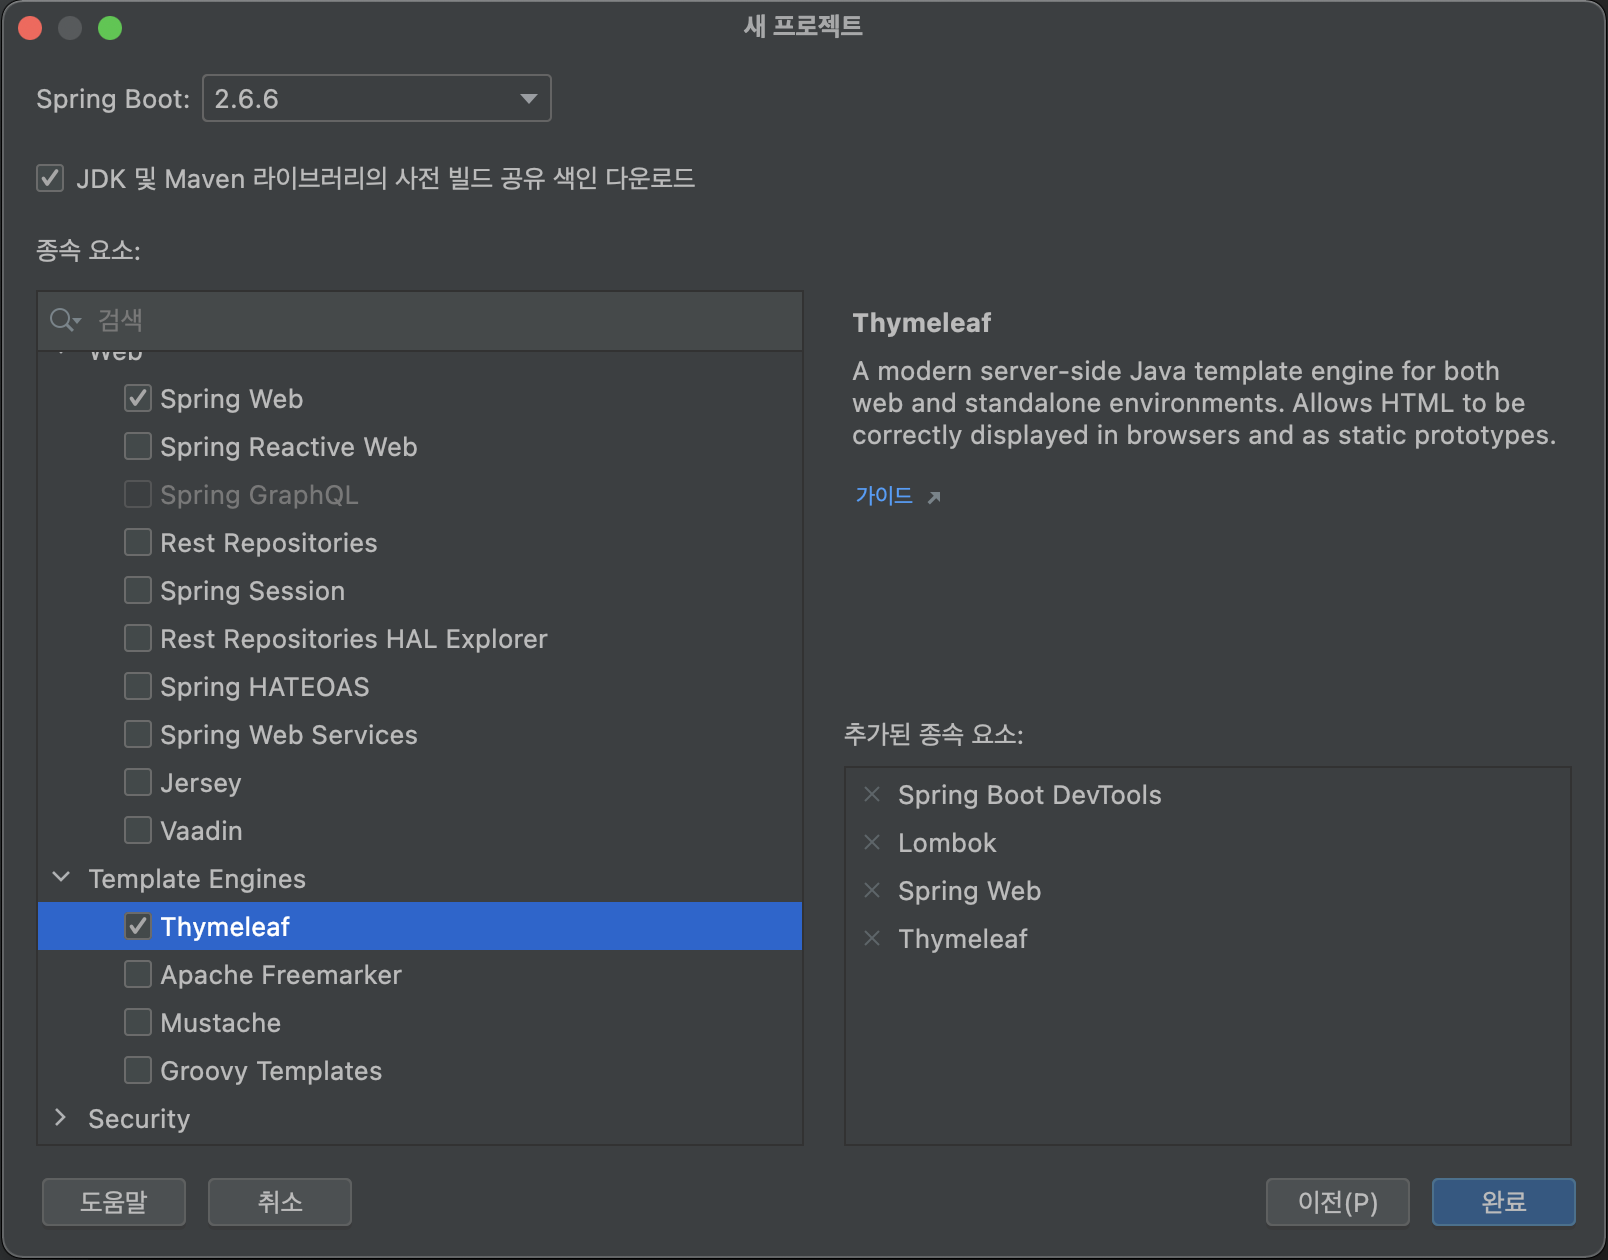
- Dependencies: Spring Boot DevTools, Lombok, Spring Web, Thymeleaf
Git/GitHub 연동
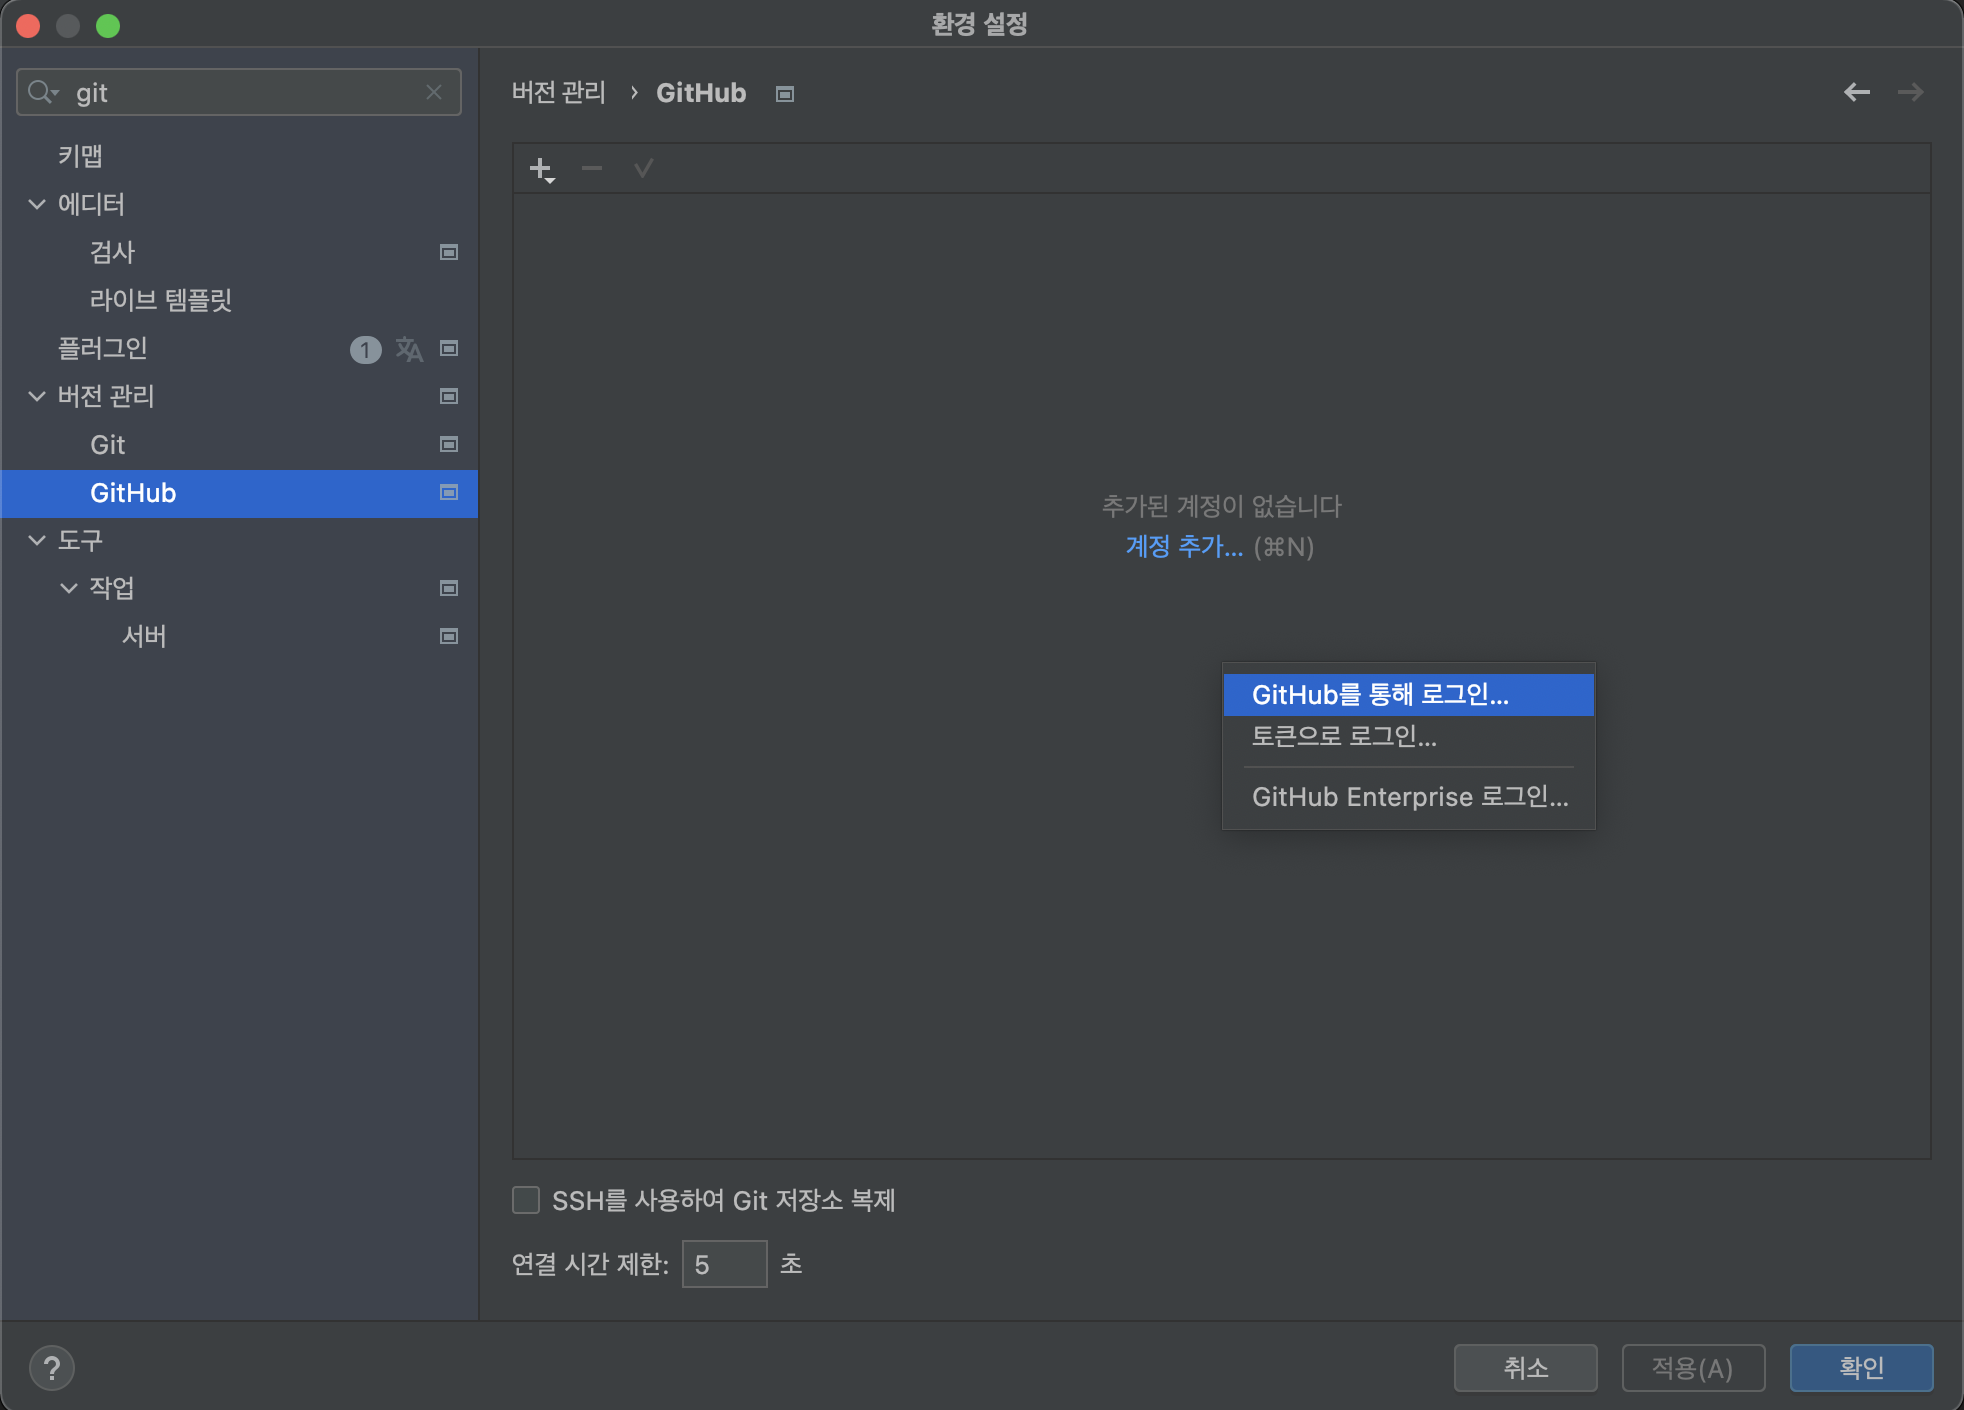
처음에 IntelliJ IDEA의 환경 설정에 들어가면 버전관리 > GitHub에서 내 깃허브 계정을 연동할 수 있다. 계정 추가를 클릭해서 GitHub를 통해 로그인을 선택했다.
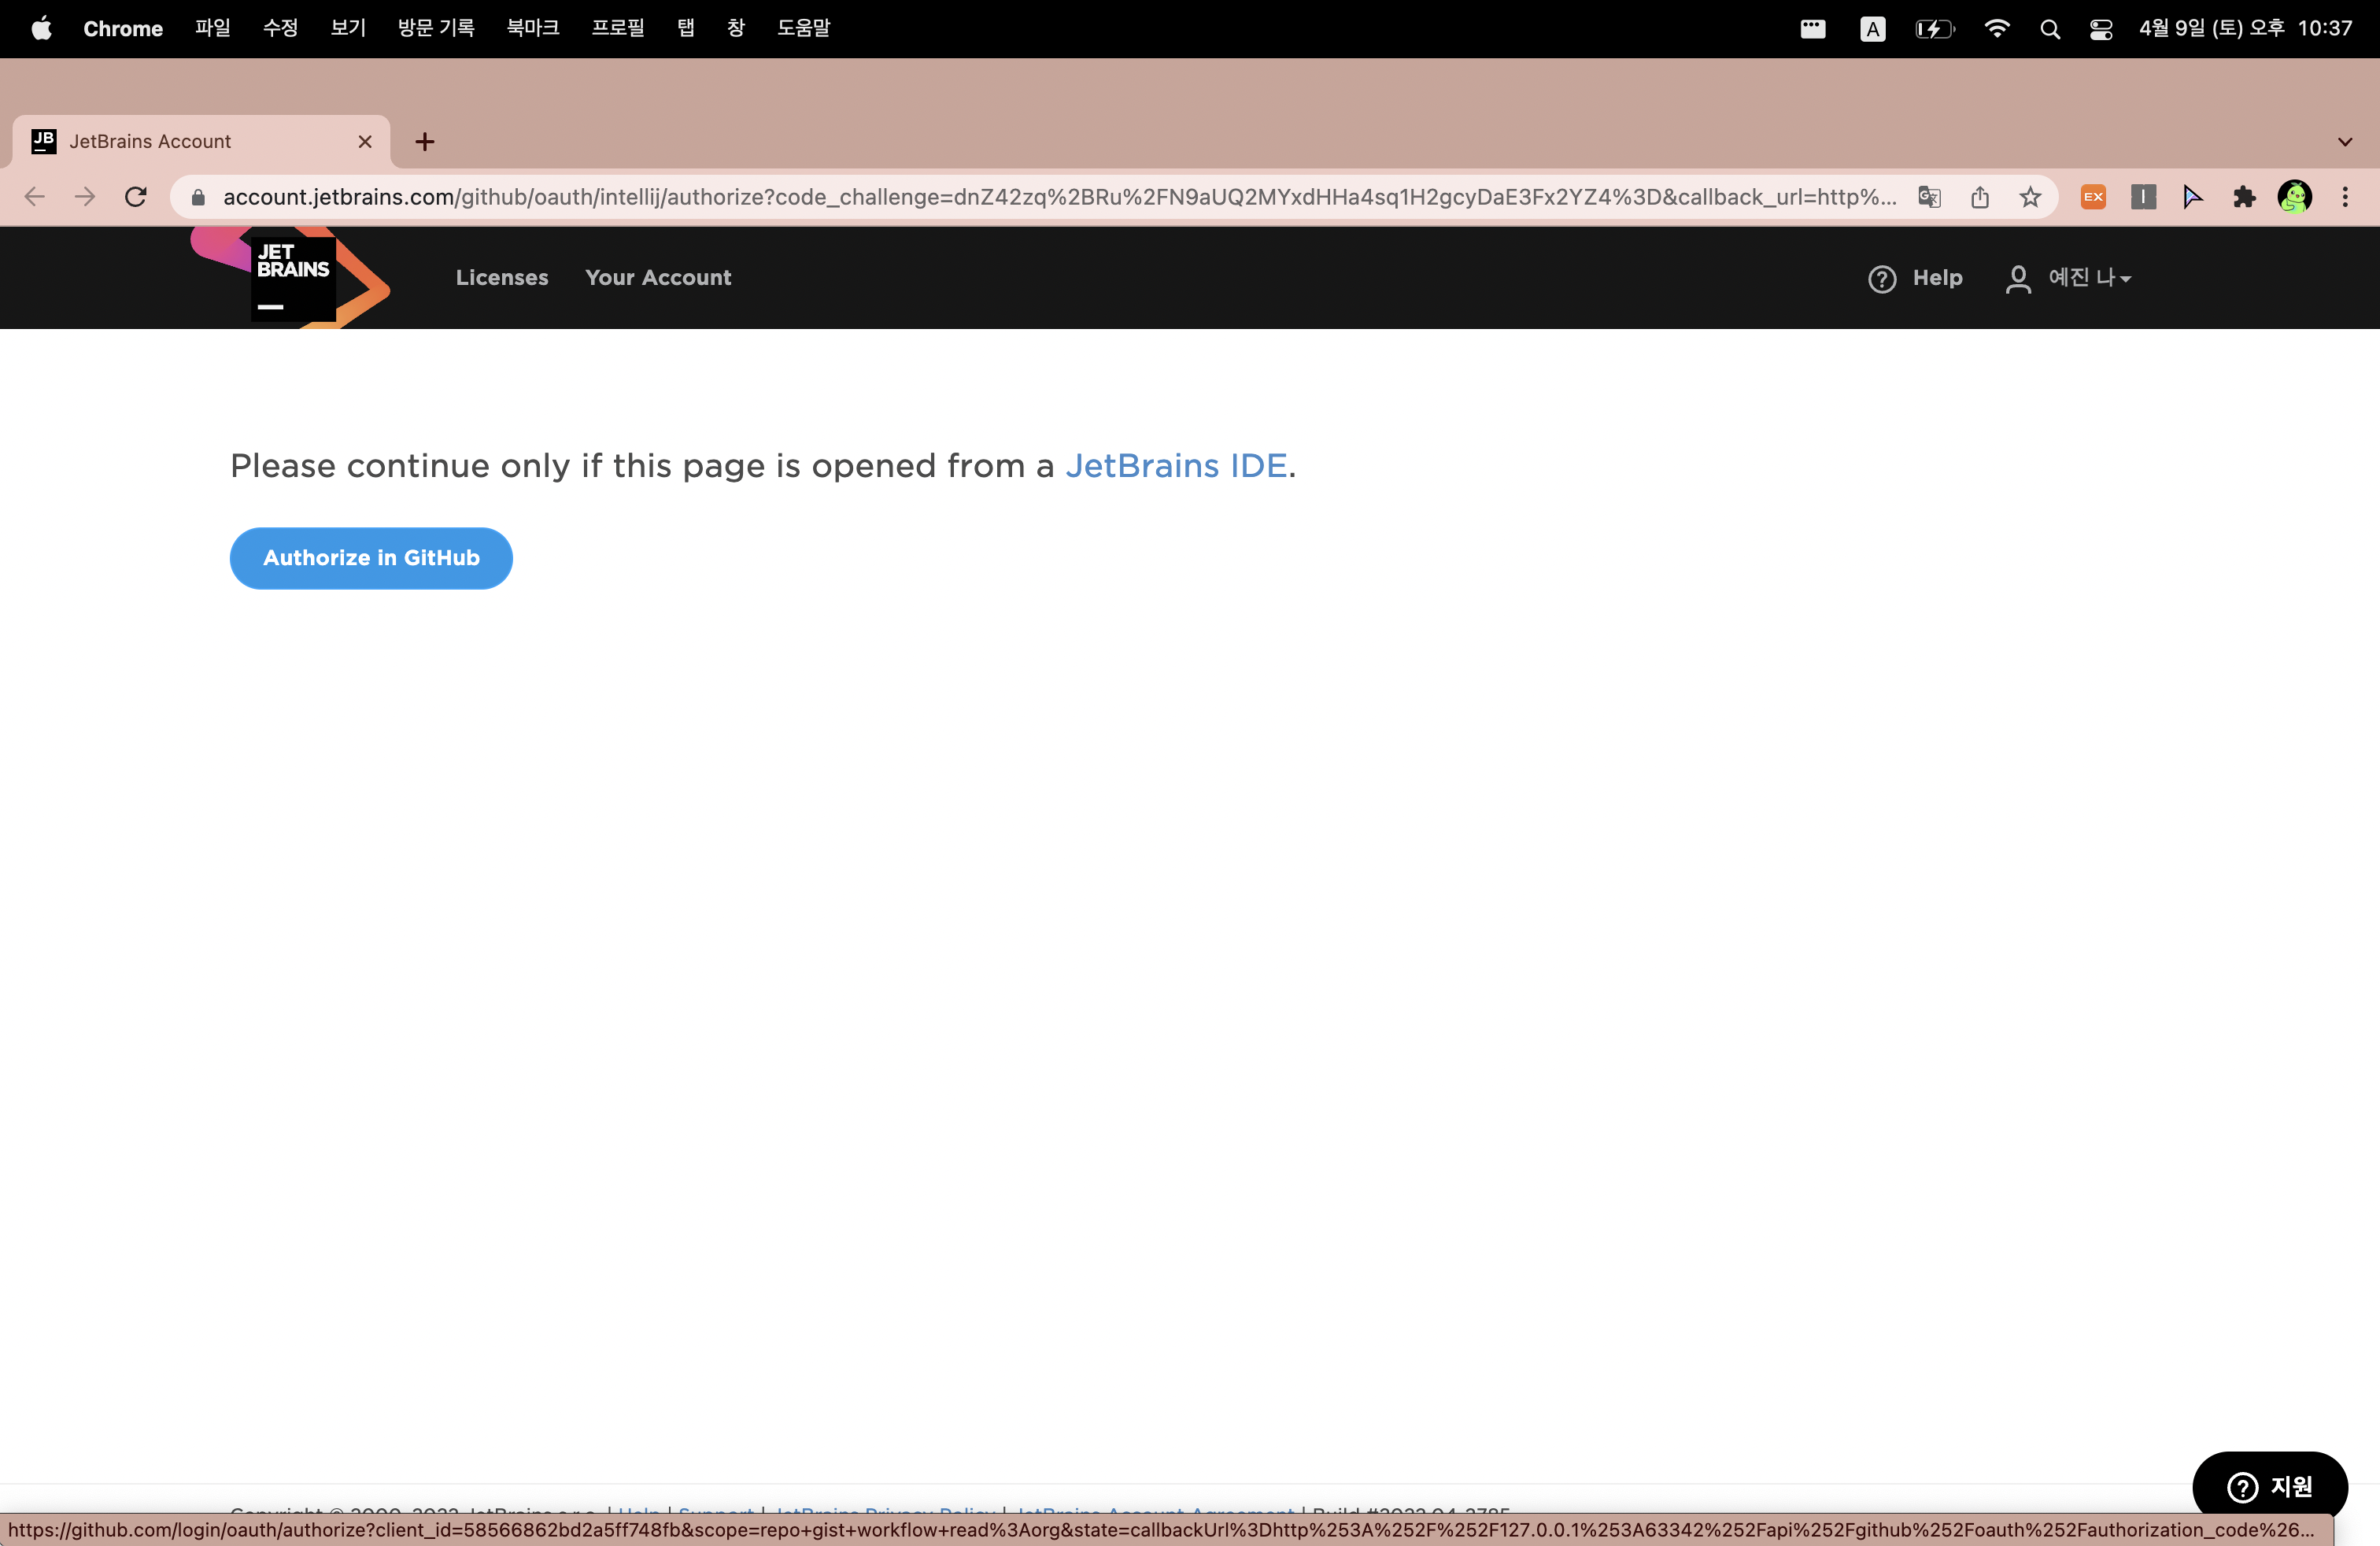
그러면 위와 같은 웹사이트 창이 열리고, Authorize in GitHub를 클릭한다.

이후 성공적으로 권한이 부여됐으며 페이지를 닫아도 된다고 뜬다.
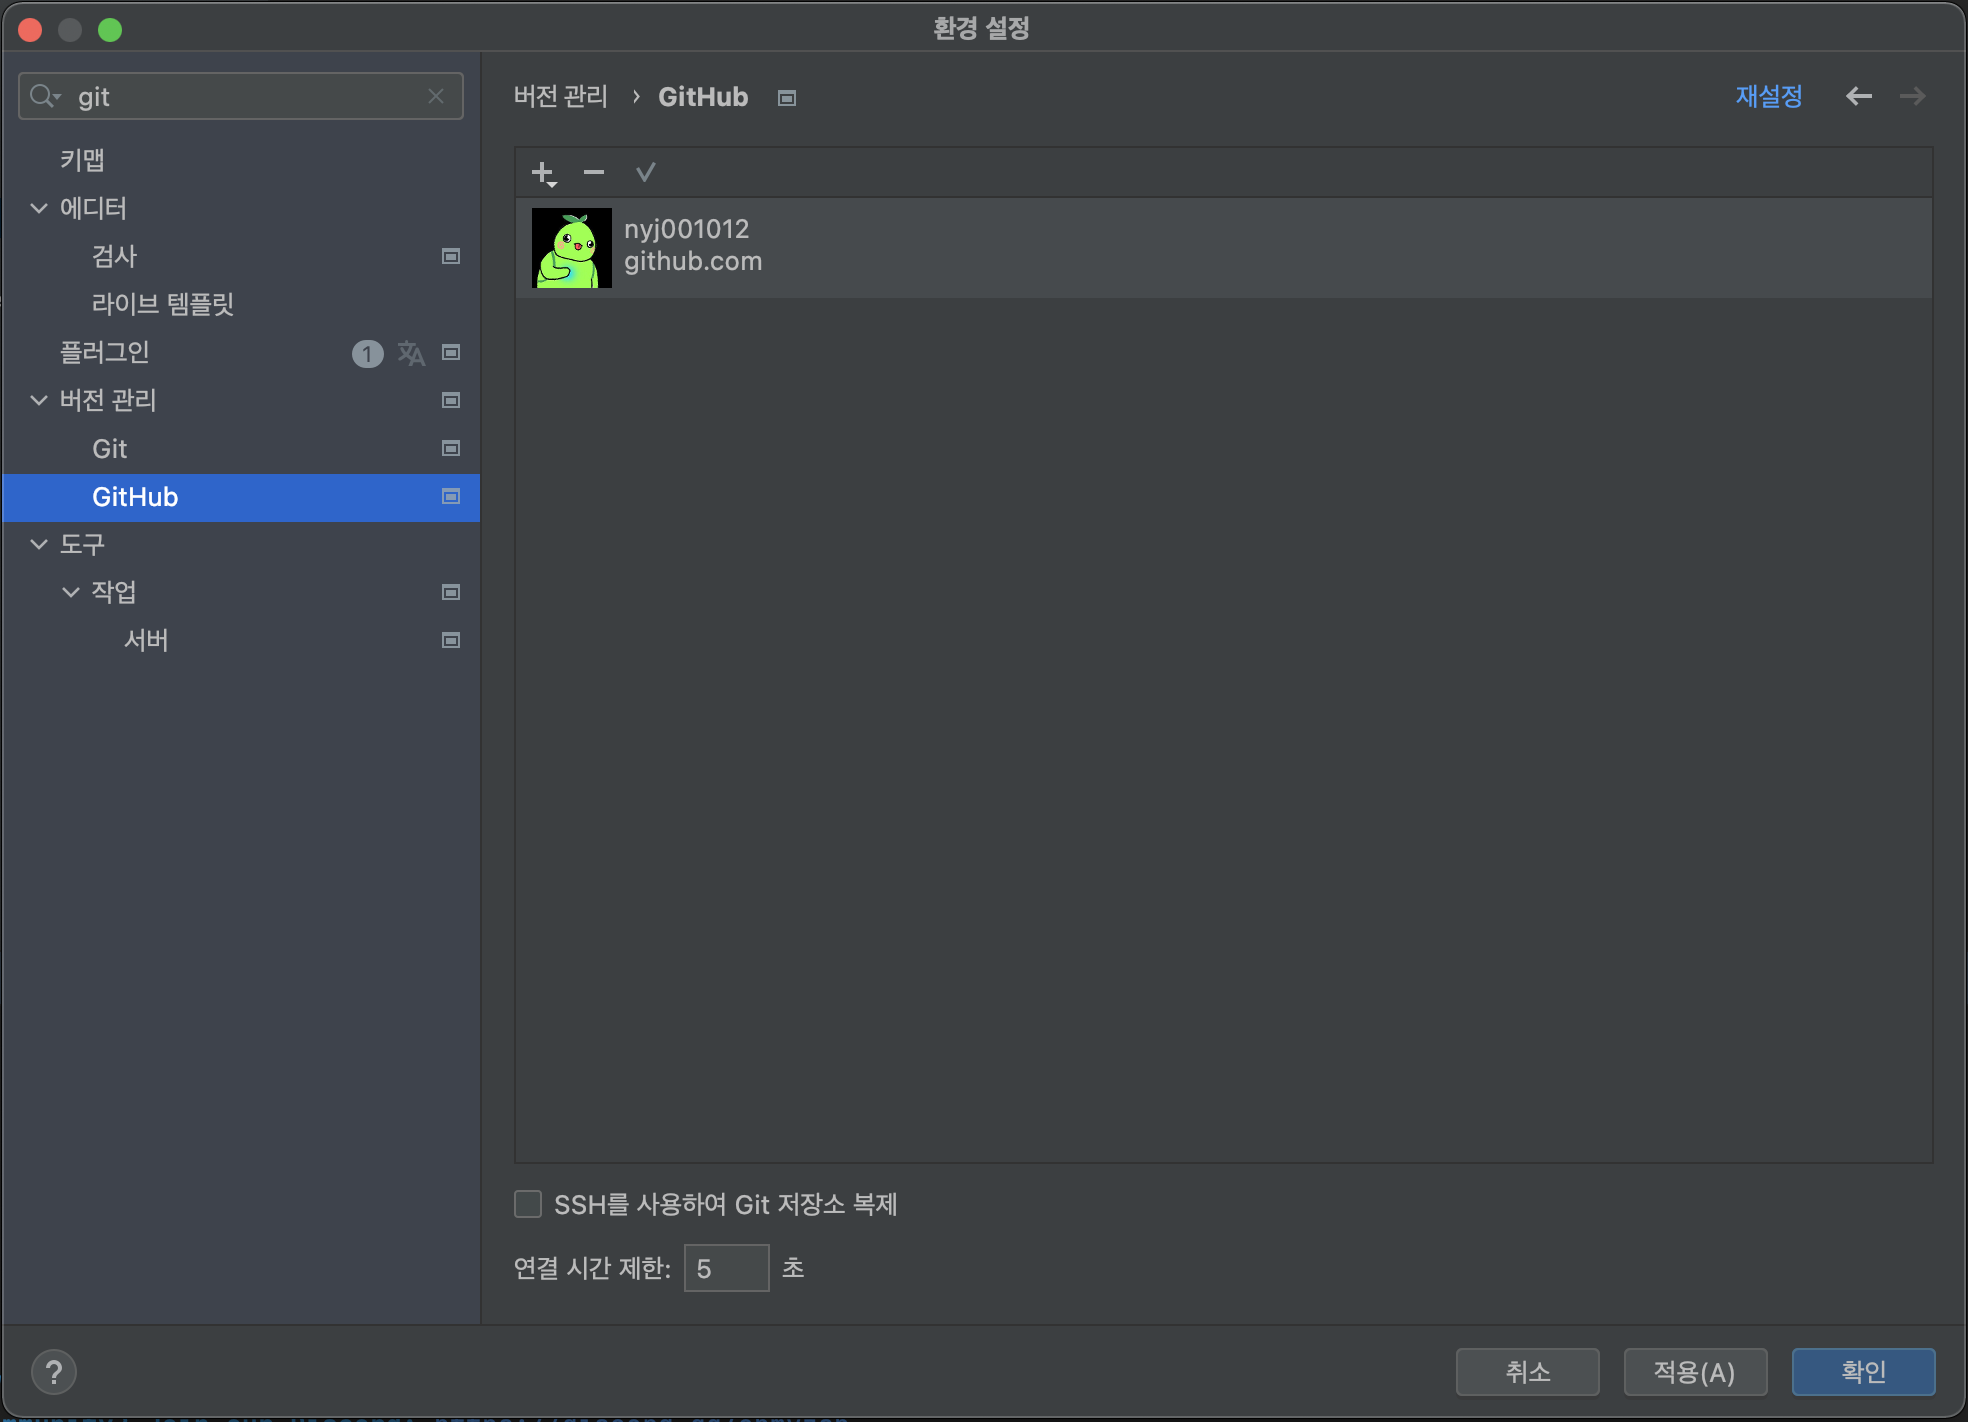
저 메시지가 뜨면 이제 아까는 보이지 않던 GitHub의 계정에 내 계정이 등록되었음을 확인할 수 있다.
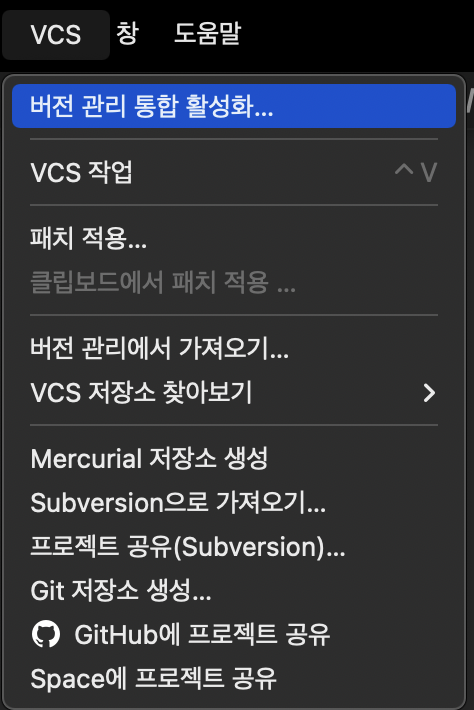
이제 Git 연동을 하기 위해 상단의 IntelliJ 메뉴의 VCS에서 버전 관리 통합 활성화...를 클릭한다.
이후 나는 버전 관리 시스템으로 Git을 선택했다. Git 외에도 SVN도 있었다.
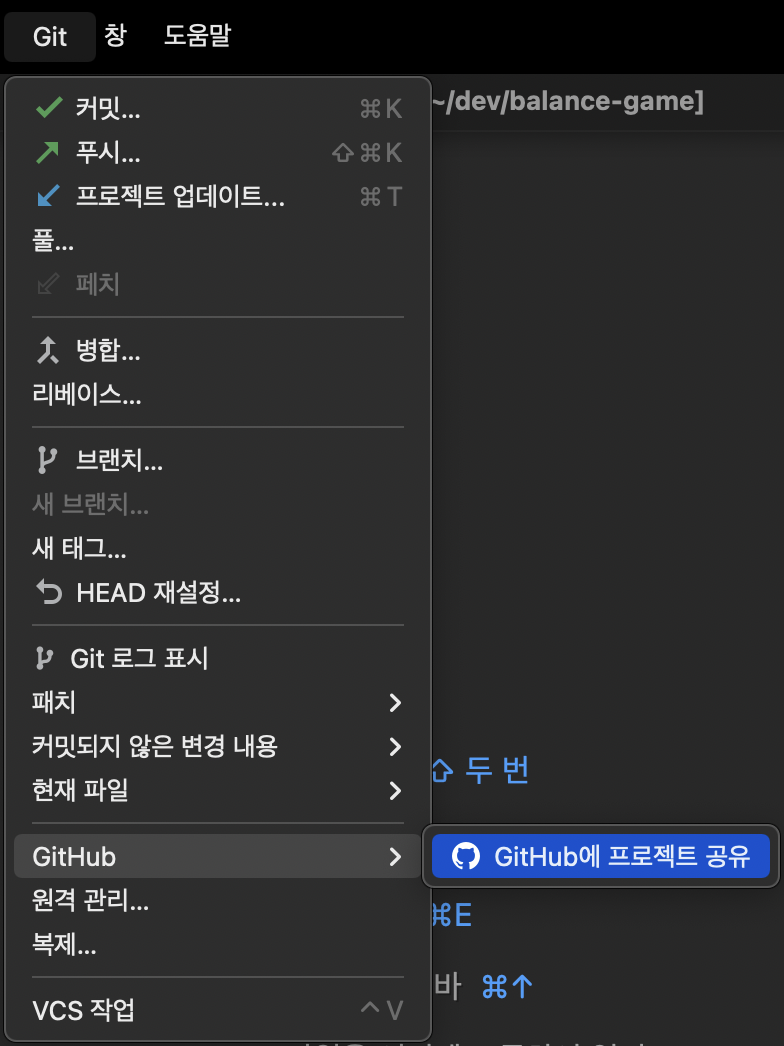
그러면 아까 있던 VCS 메뉴 대신에 Git 메뉴가 활성화된다. 현재 이 프로젝트는 GitHub 레포지토리도 없는 상태이므로, GitHub에 프로젝트 공유를 함으로써 레포지토리도 함께 생성하도록 하겠다.
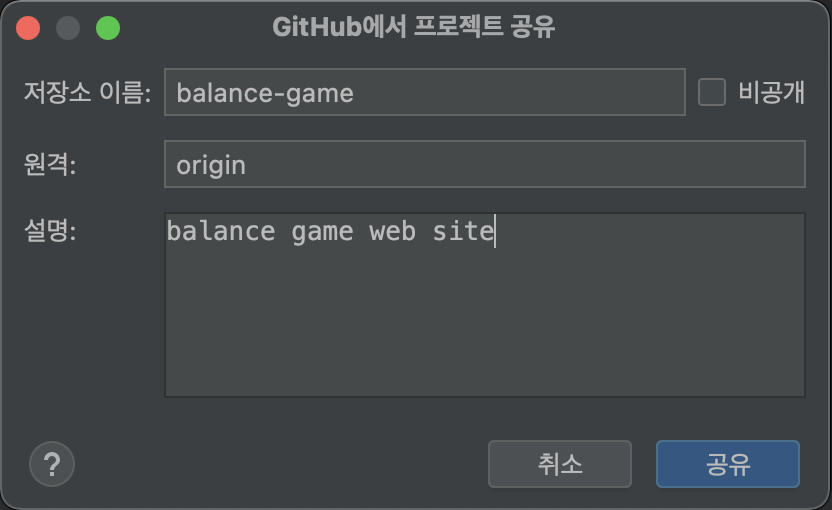
저장소 이름과 설명을 적고 공유를 한다.


그러면 IntelliJ에서 깃허브 레포지토리 생성과 함께 연동이 잘 되었음을 확인할 수 있다.
prettier, eslint 설치
나중에 자바 스크립트나 CSS 등을 작성할 때, 코드 포맷팅이나 문법적인 부분을 검사하기 위해 prettier와 eslint를 설치하기로 했다.
우선 prettier부터 설치하자.
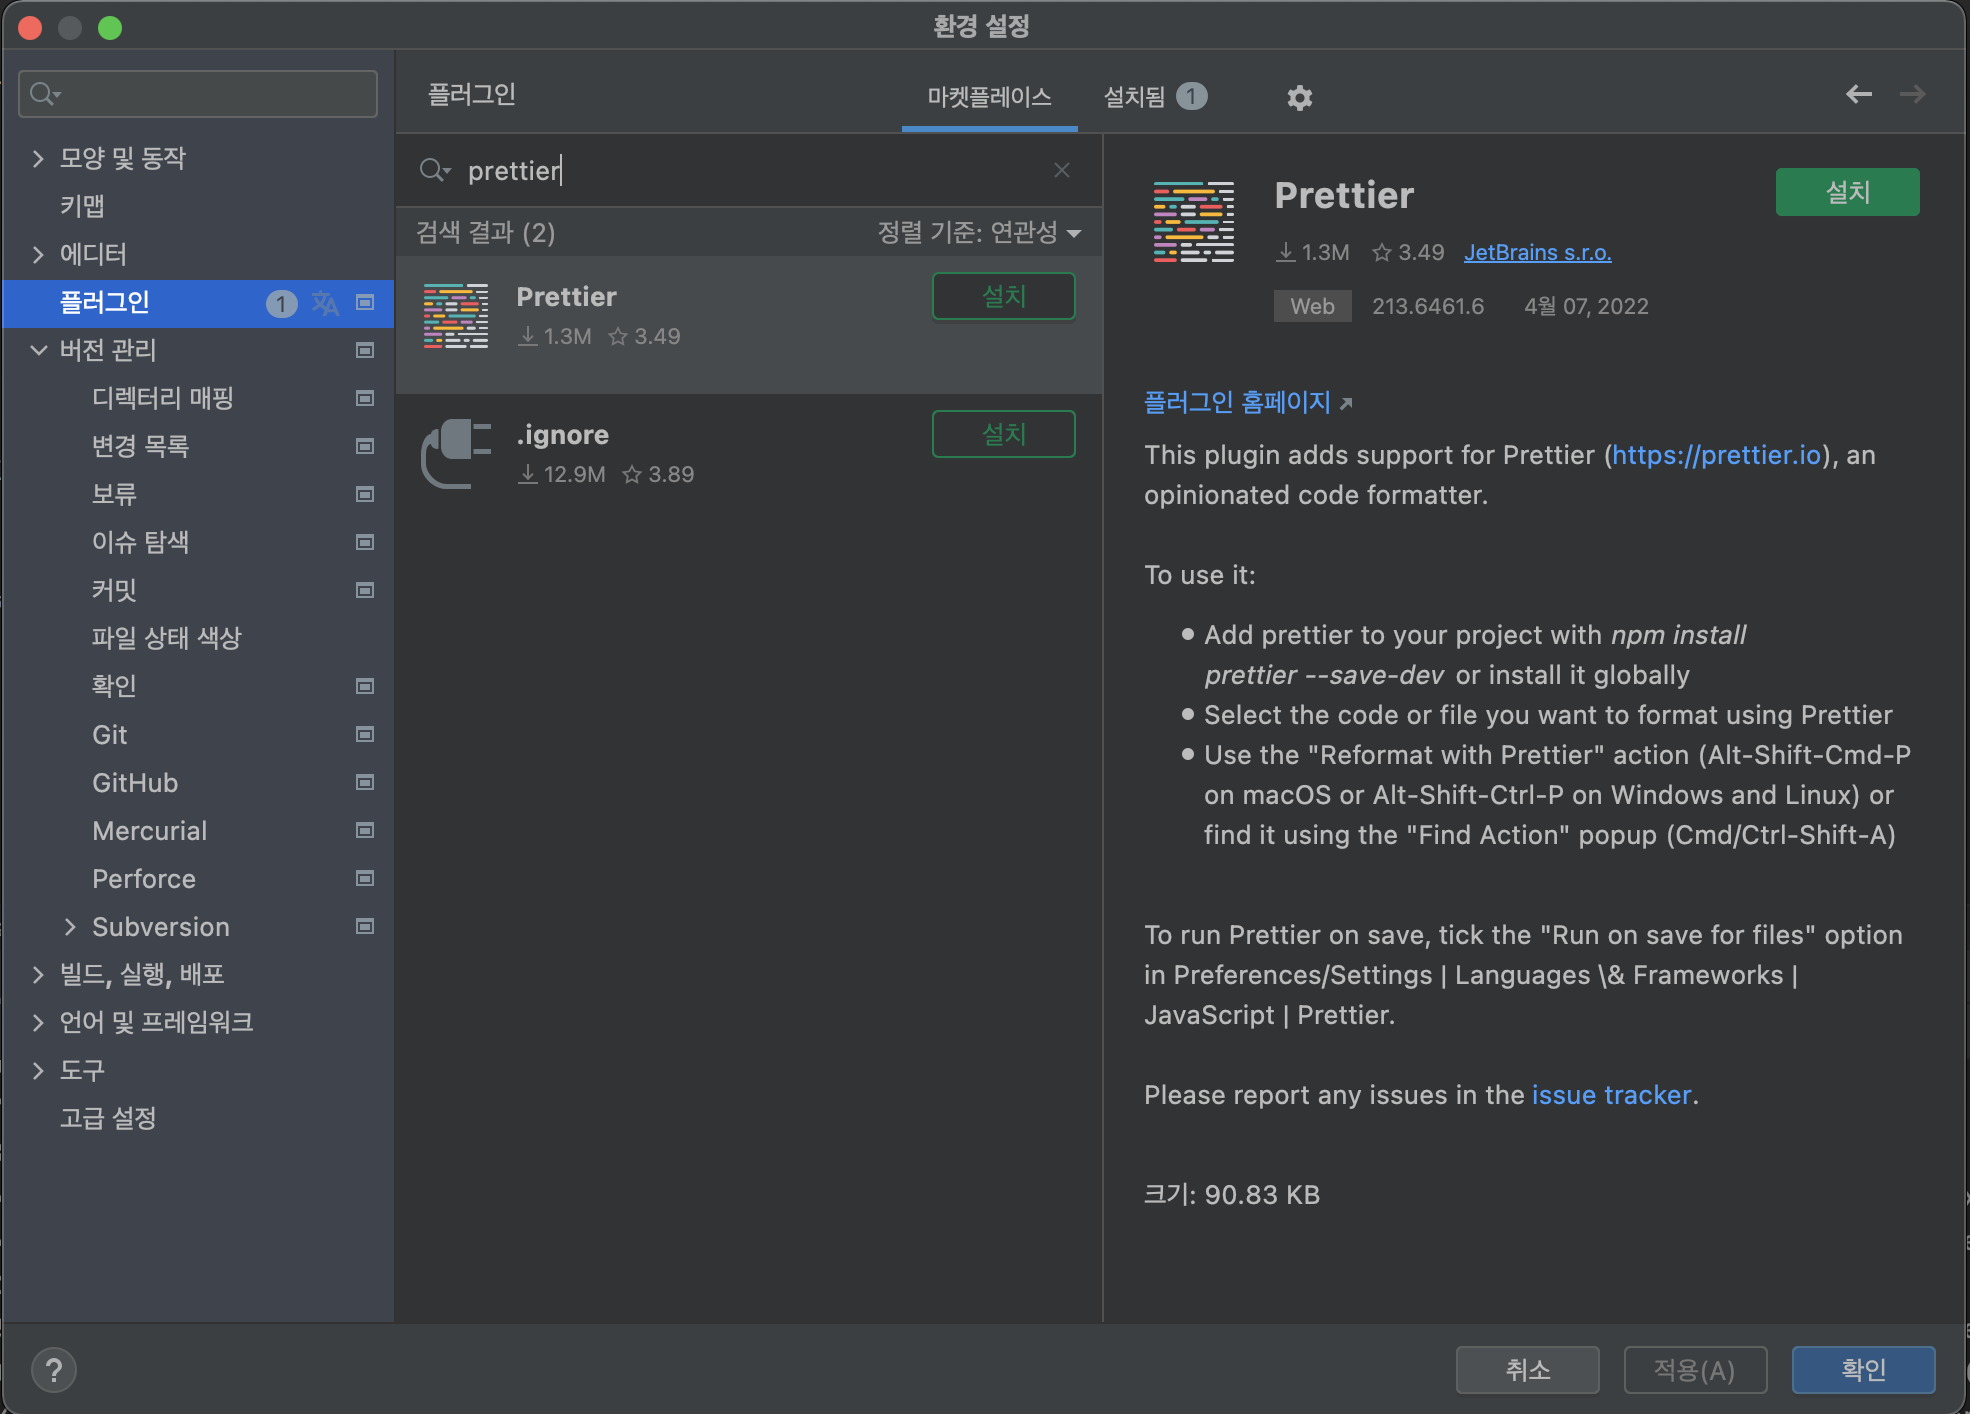
IntelliJ IDEA의 환경 설정에 들어가서 플러그인 항목을 보면, 마켓플레이스에서 원하는 플러그인을 쉽게 설치할 수 있다.
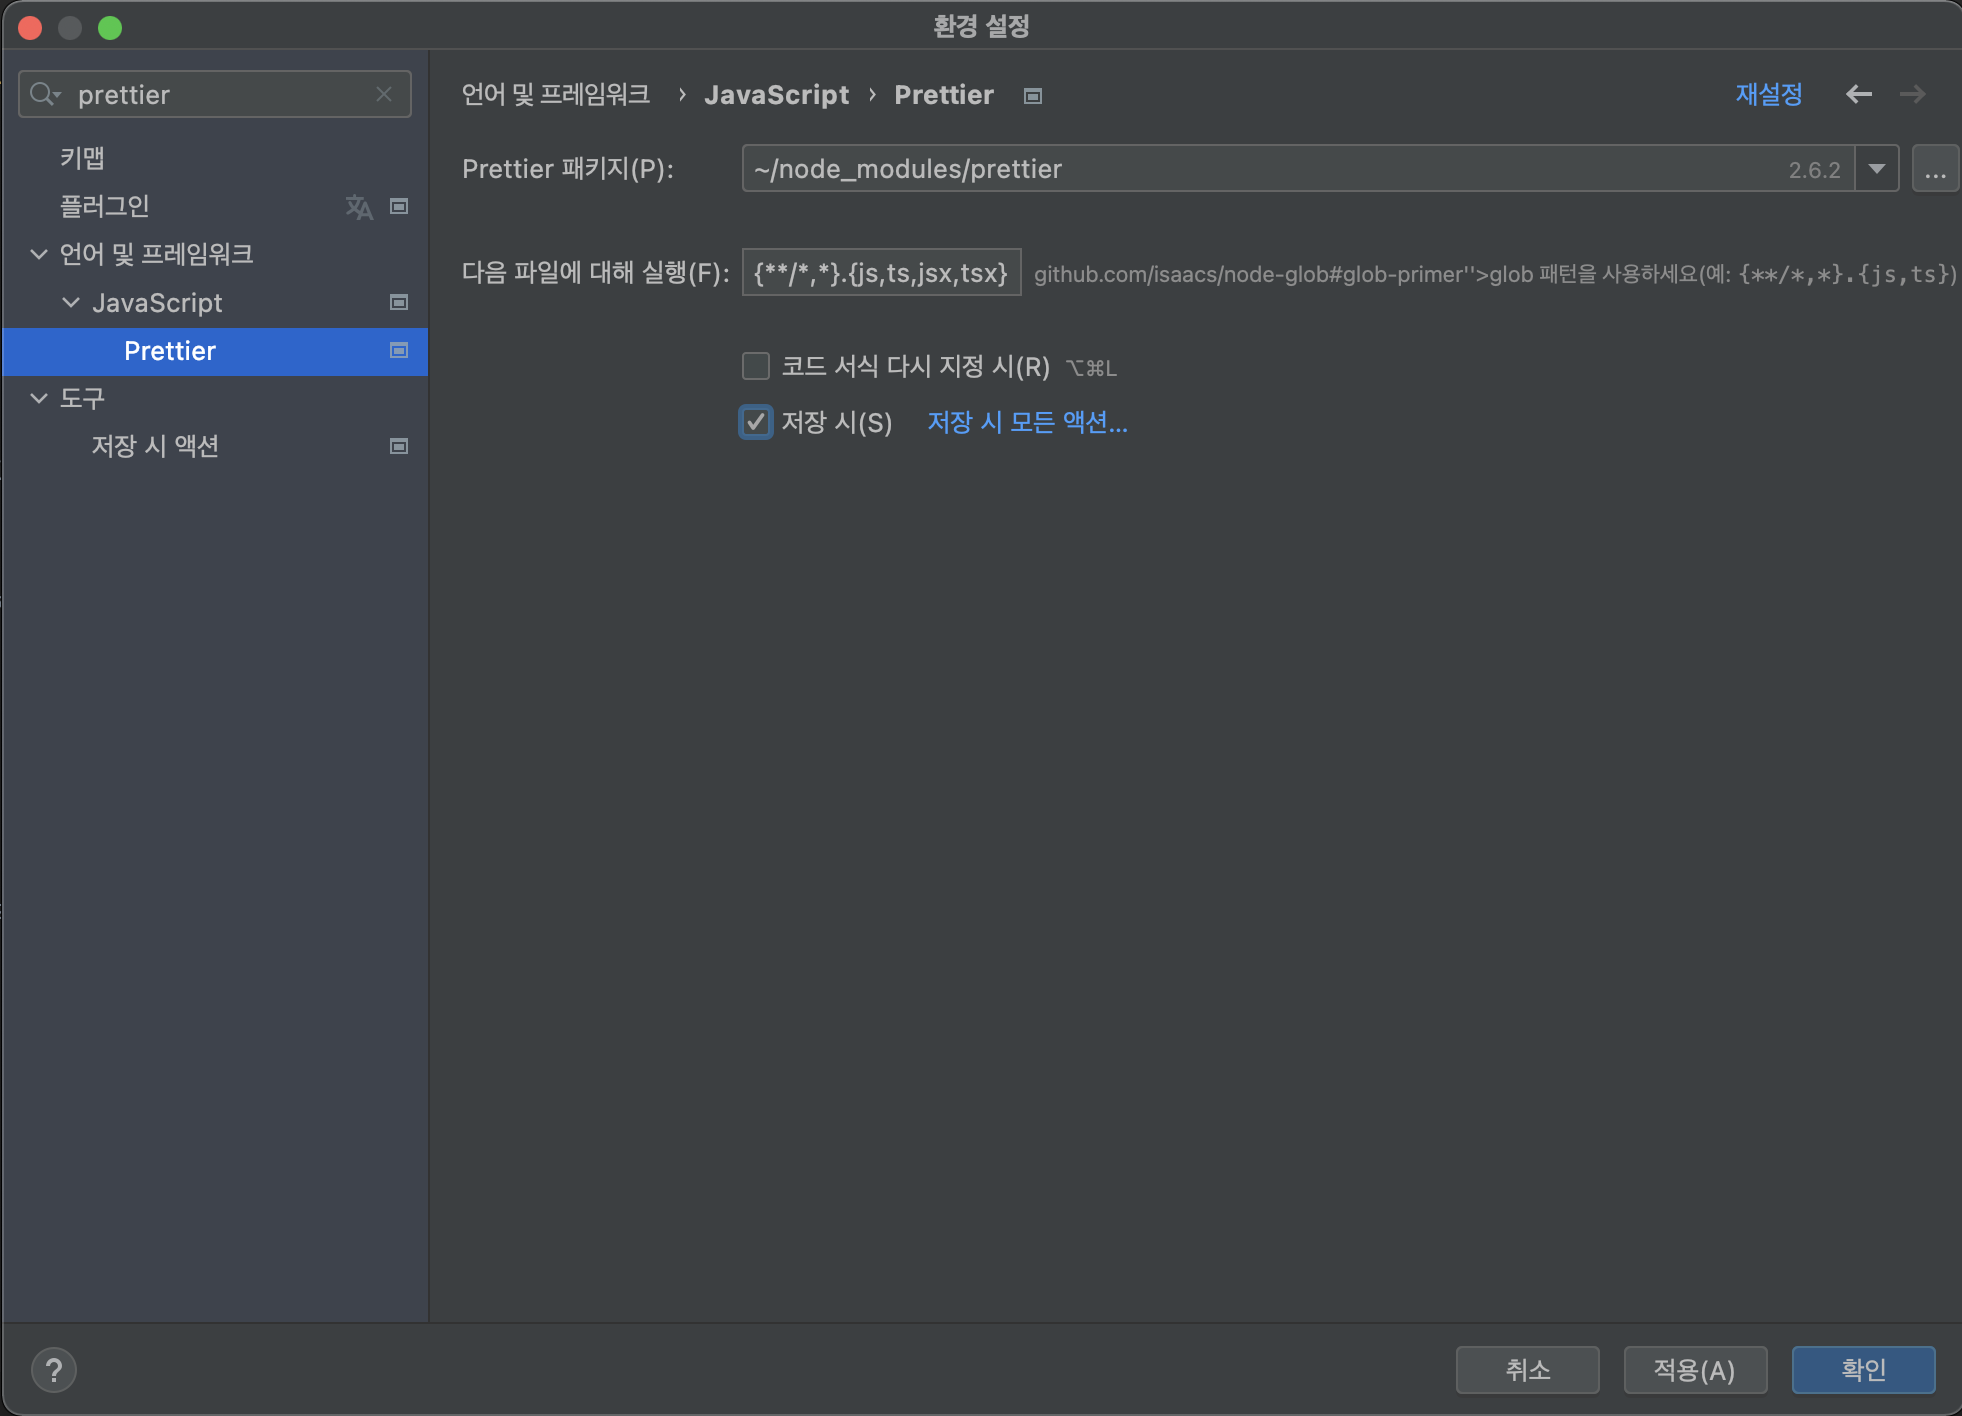
설치가 성공적으로 끝나면 언어 및 프레임워크 > JavaScript > Prettier에서 저장 시(S)를 체크하여, 저장할 때마다 prettier가 동작하도록 해줬다.
이번엔 eslint를 설치하자.
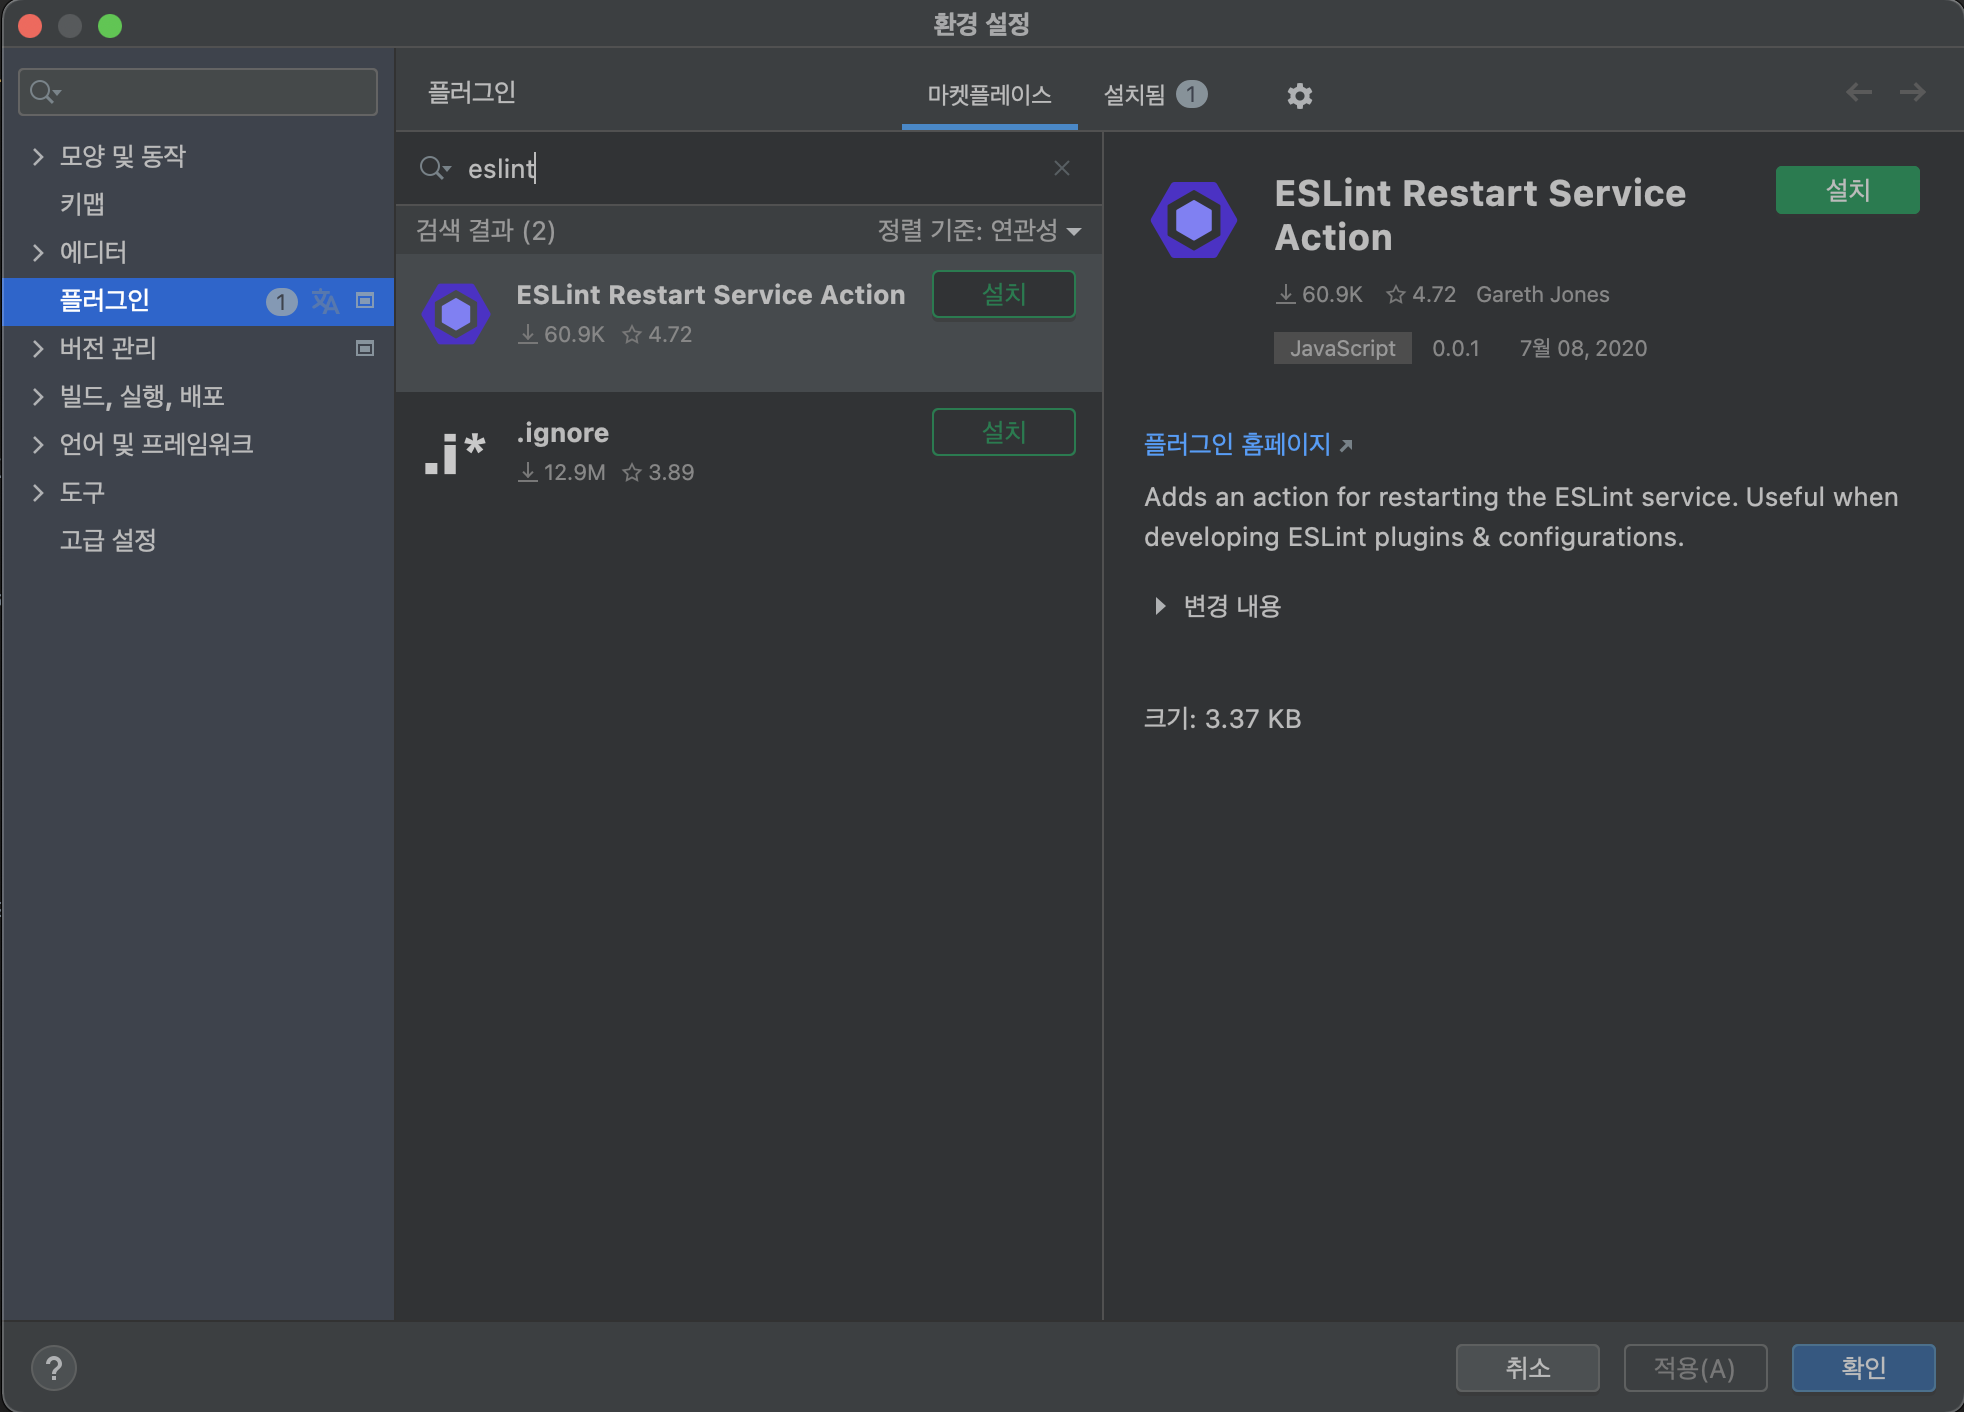
prettier와 마찬가지로 마켓플레이스에서 설치해줬다.
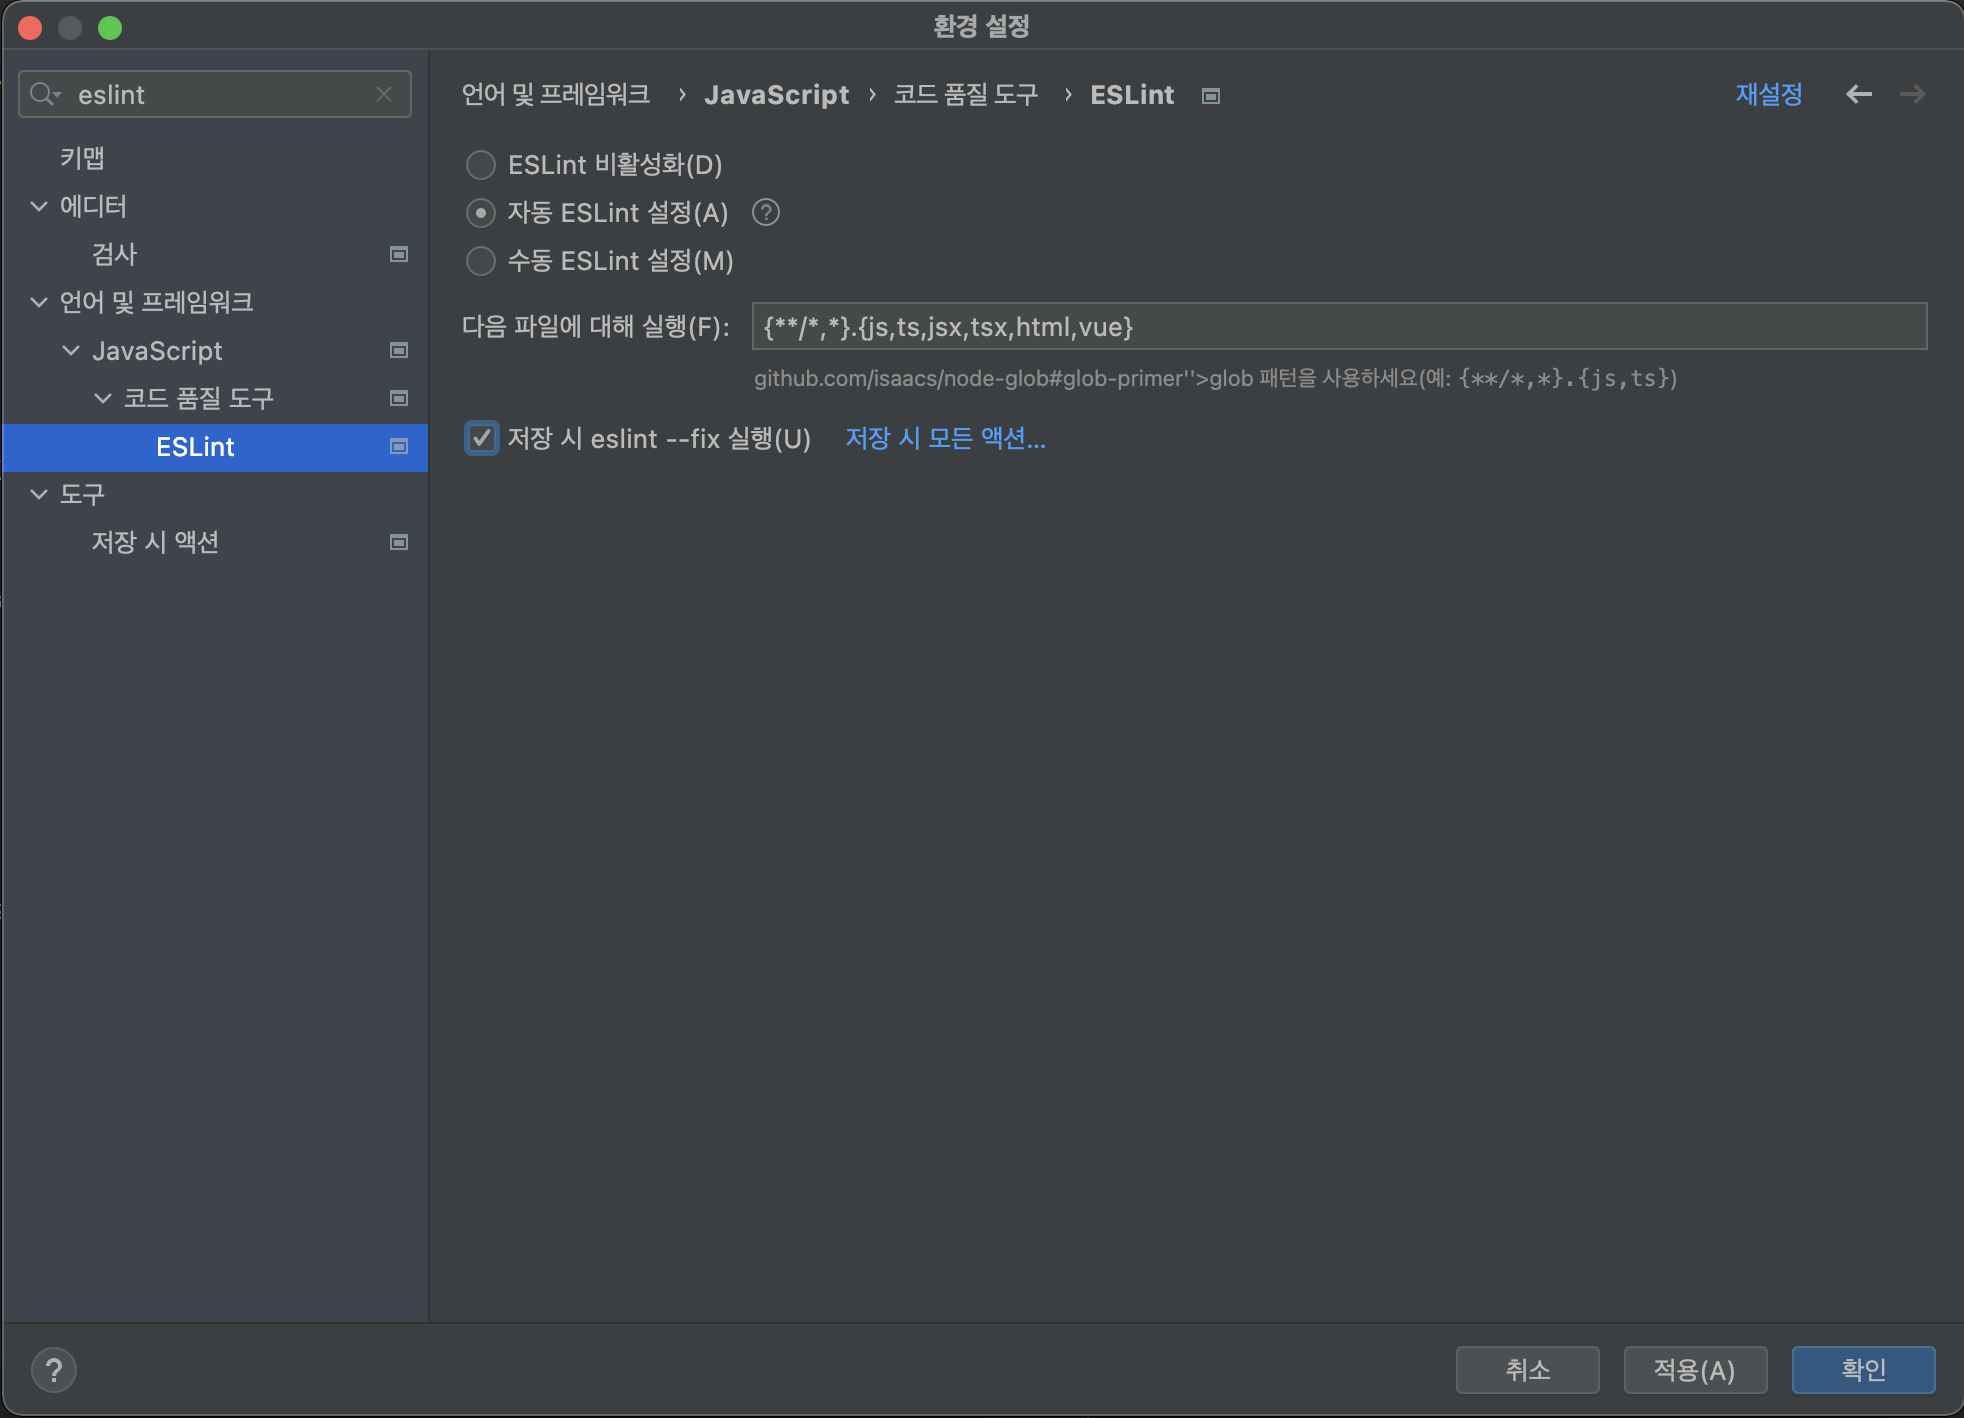
eslint도 저장할 때마다 실행되도록 설정해줬다.
여기서 문제가 생긴 게, 아무리 prettier와 eslint를 설치해도 적용이 잘 되지 않았다. 알고 보니 npm으로 그 둘을 설치해줘야 적용이 된다고 하더라… 난 npm으로 따로 설치 안 해줘도 되는 줄 알았다. 그래서 급하게 npm으로 eslint 및 prettier도 확실하게 설치해줬다.
~ > brew install node
node를 설치하고 나면 npm -v로 npm의 버전을 확인한다.
~ > npm -v
8.5.5

~ > npm install prettier eslint-config-prettier eslint-plugin-prettier -D
그냥 npm install prettier eslint하면 되지 않나 싶을 수도 있는데, prettier와 eslint가 워낙 충돌이 잦아서 일부러 저렇게 설치한 것 같다. 실제로 vscode에서 설치하면 둘의 충돌을 방지하기 위해 json 파일을 수정하여 별도의 설정을 했었다.
전부 설치하고 나서 npm list 명령어를 실행하면 위에서 설치한 세 가지가 전부 잘 출력되는 걸 볼 수 있다.
~ > npm list
nayejin@ /Users/nayejin
├── eslint-config-prettier@8.5.0
├── eslint-plugin-prettier@4.0.0
└── prettier@2.6.2
위와 같이 설치하고 나면
HTML, CSS 작성
깃 연동도 잘 되었으니, 이제 HTML과 CSS를 작성하겠다.
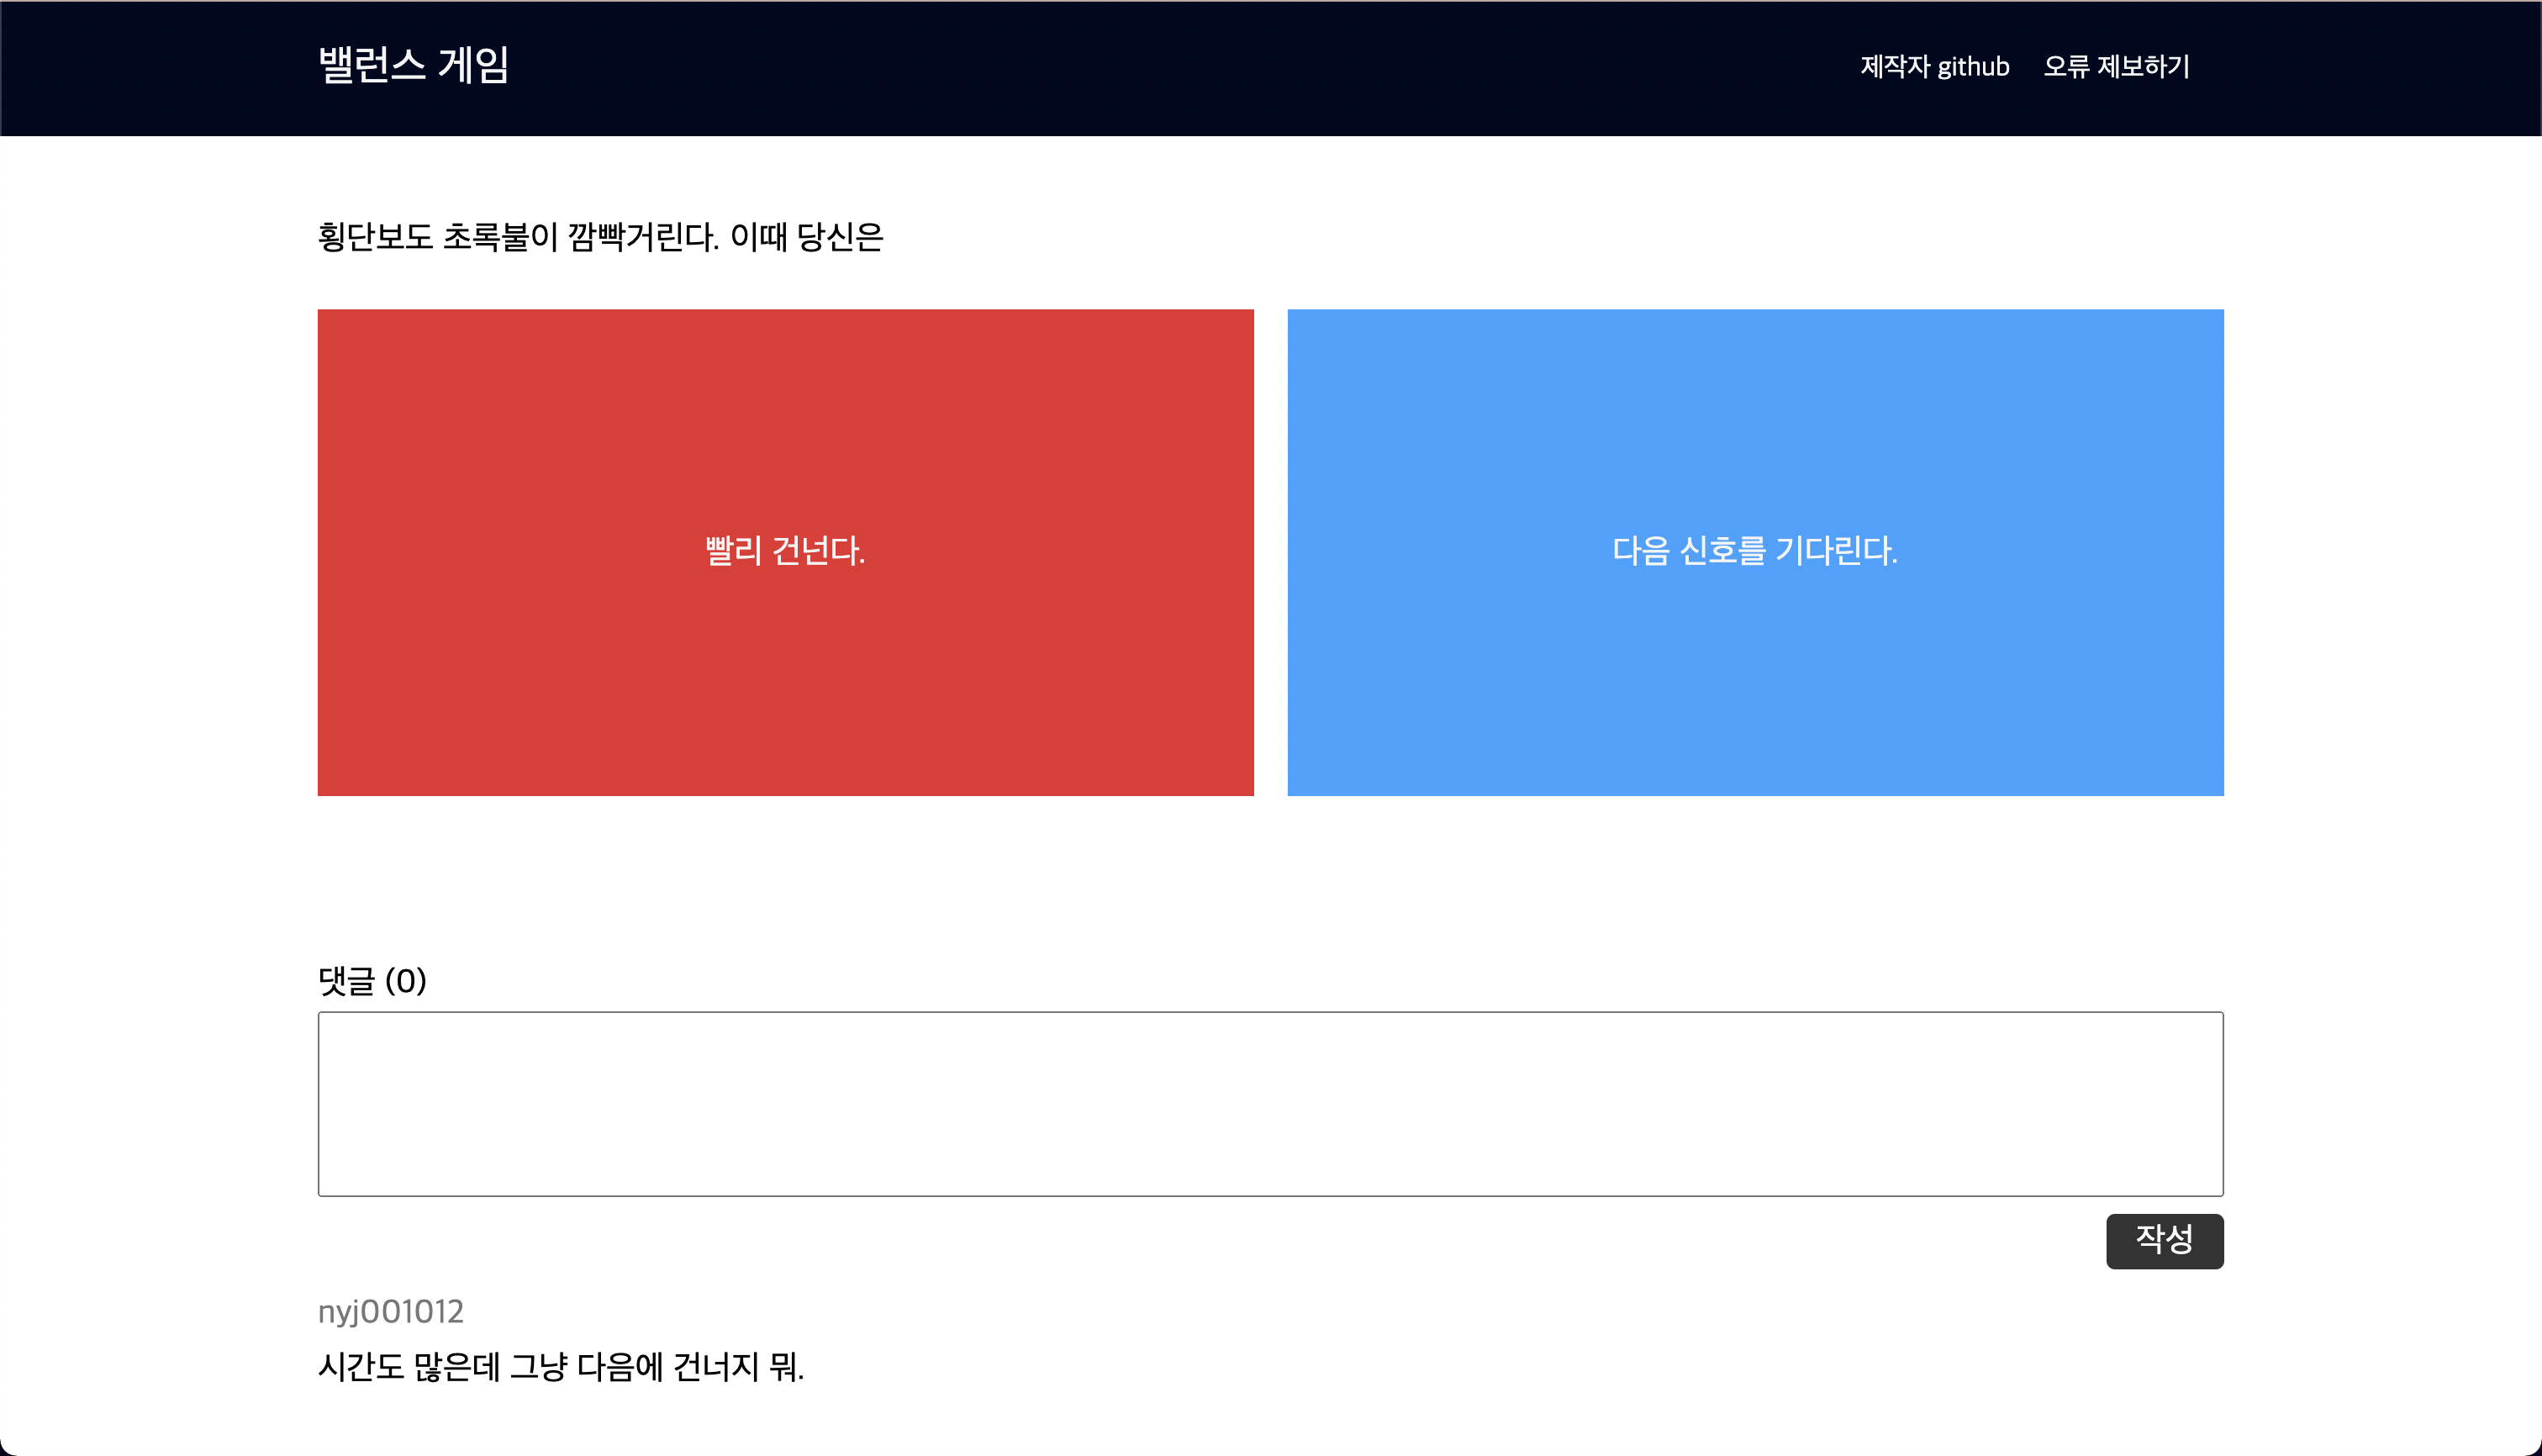
일단 HTML은 메인 페이지 한 개 정도로 생각하고 있다. 메인 페이지인 play.html을 src > main > resources > templates에 생성하고 다음과 같이 작성했다.
<!DOCTYPE html>
<html lang="ko">
<head>
    <link rel="stylesheet" type="text/css" href="/css/normalize.css">
    <link rel="stylesheet" type="text/css" href="/css/play.css">
    <meta charset="UTF-8">
    <title>밸런스 게임</title>
</head>
<body>
    <header>
        <div id="header-wrapper">
            <div id="site-title">
                밸런스 게임
            </div>
            <div id="menu-wrapper">
                <div id="creator">
                    제작자 github
                </div>
                <div id="report-error">
                    오류 제보하기
                </div>
            </div>
        </div>
    </header>
    <div id="content">
        <div id="content-wrapper">
            <div id="question-wrapper">
                <div id="question">
                    횡단보도 초록불이 깜빡거린다. 이때 당신은
                </div>
            </div>
            <div id="answer-wrapper">
                <div class="answer bg-red">빨리 건넌다.</div>
                <div class="answer bg-blue">다음 신호를 기다린다.</div>
            </div>
            <div id="comments">
                <div id="comments-count">
                    댓글 (0)
                </div>
                <div id="write-wrapper">
                    <input type="text" id="write-text">
                    <input type="submit" id="write-button" value="작성">
                </div>
                <div id="comments-wrapper">
                    <div id="name">
                        nyj001012
                    </div>
                    <div id="text">
                        시간도 많은데 그냥 다음에 건너지 뭐.
                    </div>
                </div>
            </div>
        </div>
    </div>
    <footer>
         <div id="copyright">
             Copyright.2022.nyj001012.All rights reserved.
         </div>
    </footer>
</body>
</html>
그리고 CSS는 src/main/resources/static/css에 play.css를 생성하고 아래와 같이 작성하였다.
/**
 body
 */
body {
    width: 100vw;
    height: 100vh;
}

/**
 header, content width
 */
header, #content {
    display: flex;
    justify-content: center;
}

header > #header-wrapper, #content > #content-wrapper {
    width: 75vw;
    max-width: 1600px;
}

/**
 header
 */
header {
    background-color: #00081f;
    color: whitesmoke;
}

header > #header-wrapper {
    height: 80px;
    display: flex;
    justify-content: space-between;
    align-items: center;
}

header > #header-wrapper > #site-title {
    font-size: 25px;
}

header > #header-wrapper > #menu-wrapper {
    display: flex;
}

header > #header-wrapper > #menu-wrapper > *:not(last-child) {
    margin-right: 20px;
}

/**
 content
 */
#content {
    flex-direction: column;
    align-items: center;
}

#content > #content-wrapper {
    flex-direction: column;
    margin: 50px 0;
    font-size: 20px;
}

#content > #content-wrapper > #question-wrapper {
    margin-bottom: 30px;
}

#content > #content-wrapper > #answer-wrapper {
    width: 100%;
    display: flex;
    justify-content: space-between;
    color: whitesmoke;
}

#content > #content-wrapper > #answer-wrapper > .answer {
    width: calc(50% - 40px);
    padding: 15px;
    height: 30vh;
    display: flex;
    align-items: center;
    justify-content: center;
}

.bg-red {
    background-color: #e72d2f;
}

.bg-blue {
    background-color: #2da2ff;
}

/**
 comments
 */
#comments {
    margin-top: 100px;
}

#comments > #comments-count {
    margin-bottom: 5px;
}

#comments > #write-wrapper {
    width: 100%;
    display: flex;
    flex-direction: column;
    align-items: flex-end;
}

#comments > #write-wrapper > #write-text {
    width: calc(100% - 24px); /* 100% - (padding width * 2 + border width) */
    height: 10vh;
    padding: 10px;
}

#comments > #write-wrapper > #write-button {
    width: 70px;
    padding: 5px;
    margin-top: 10px;
    background-color: #333;
    border: none;
    color: white;
    border-radius: 5px;
}

#comments > #comments-wrapper {
    margin: 15px 0;
}

#comments > #comments-wrapper > #name {
    margin-bottom: 10px;
    color: #777;
}

/**
 footer
 */
footer {
    display: flex;
    align-items: center;
    height: 80px;
    background-color: #eee;
    color: #aaa;
    padding: 0 50px;
}
추가적으로 여기에서 css를 초기화해주는 파일도 함께 적용시켰다.
이러면 화면은 아래와 같이 보일 것이다.
역시 이 과정이 제일 오래걸린다.
mainController 생성
src/main/java/com/nyj001012/balancegame/controller에 메인 페이지(play.html)로 연결시키는 역할을 할 mainController.java를 생성해줬다.
package com.nyj001012.balancegame.controller;

import org.springframework.stereotype.Controller;
import org.springframework.web.bind.annotation.GetMapping;

@Controller
public class mainController {
    @GetMapping("/")
    public String goPlay() {
        return "play";
    }
}
2022-04-23
git reset –hard 889171aef0a056c68c1a3b0b4eb20c945c6b4191
CSS 변경
내가 CSS 초기화를 목적으로 파일을 따로 다운 받아
<link>했었는데, 파일의 버전 관리 문제 때문에 gradle에서 의존성으로 설정해주도록 하겠다. 별도의 파일 없이 css를 적용하도록 할 것이다.
https://cdnjs.com/에 접속한다.
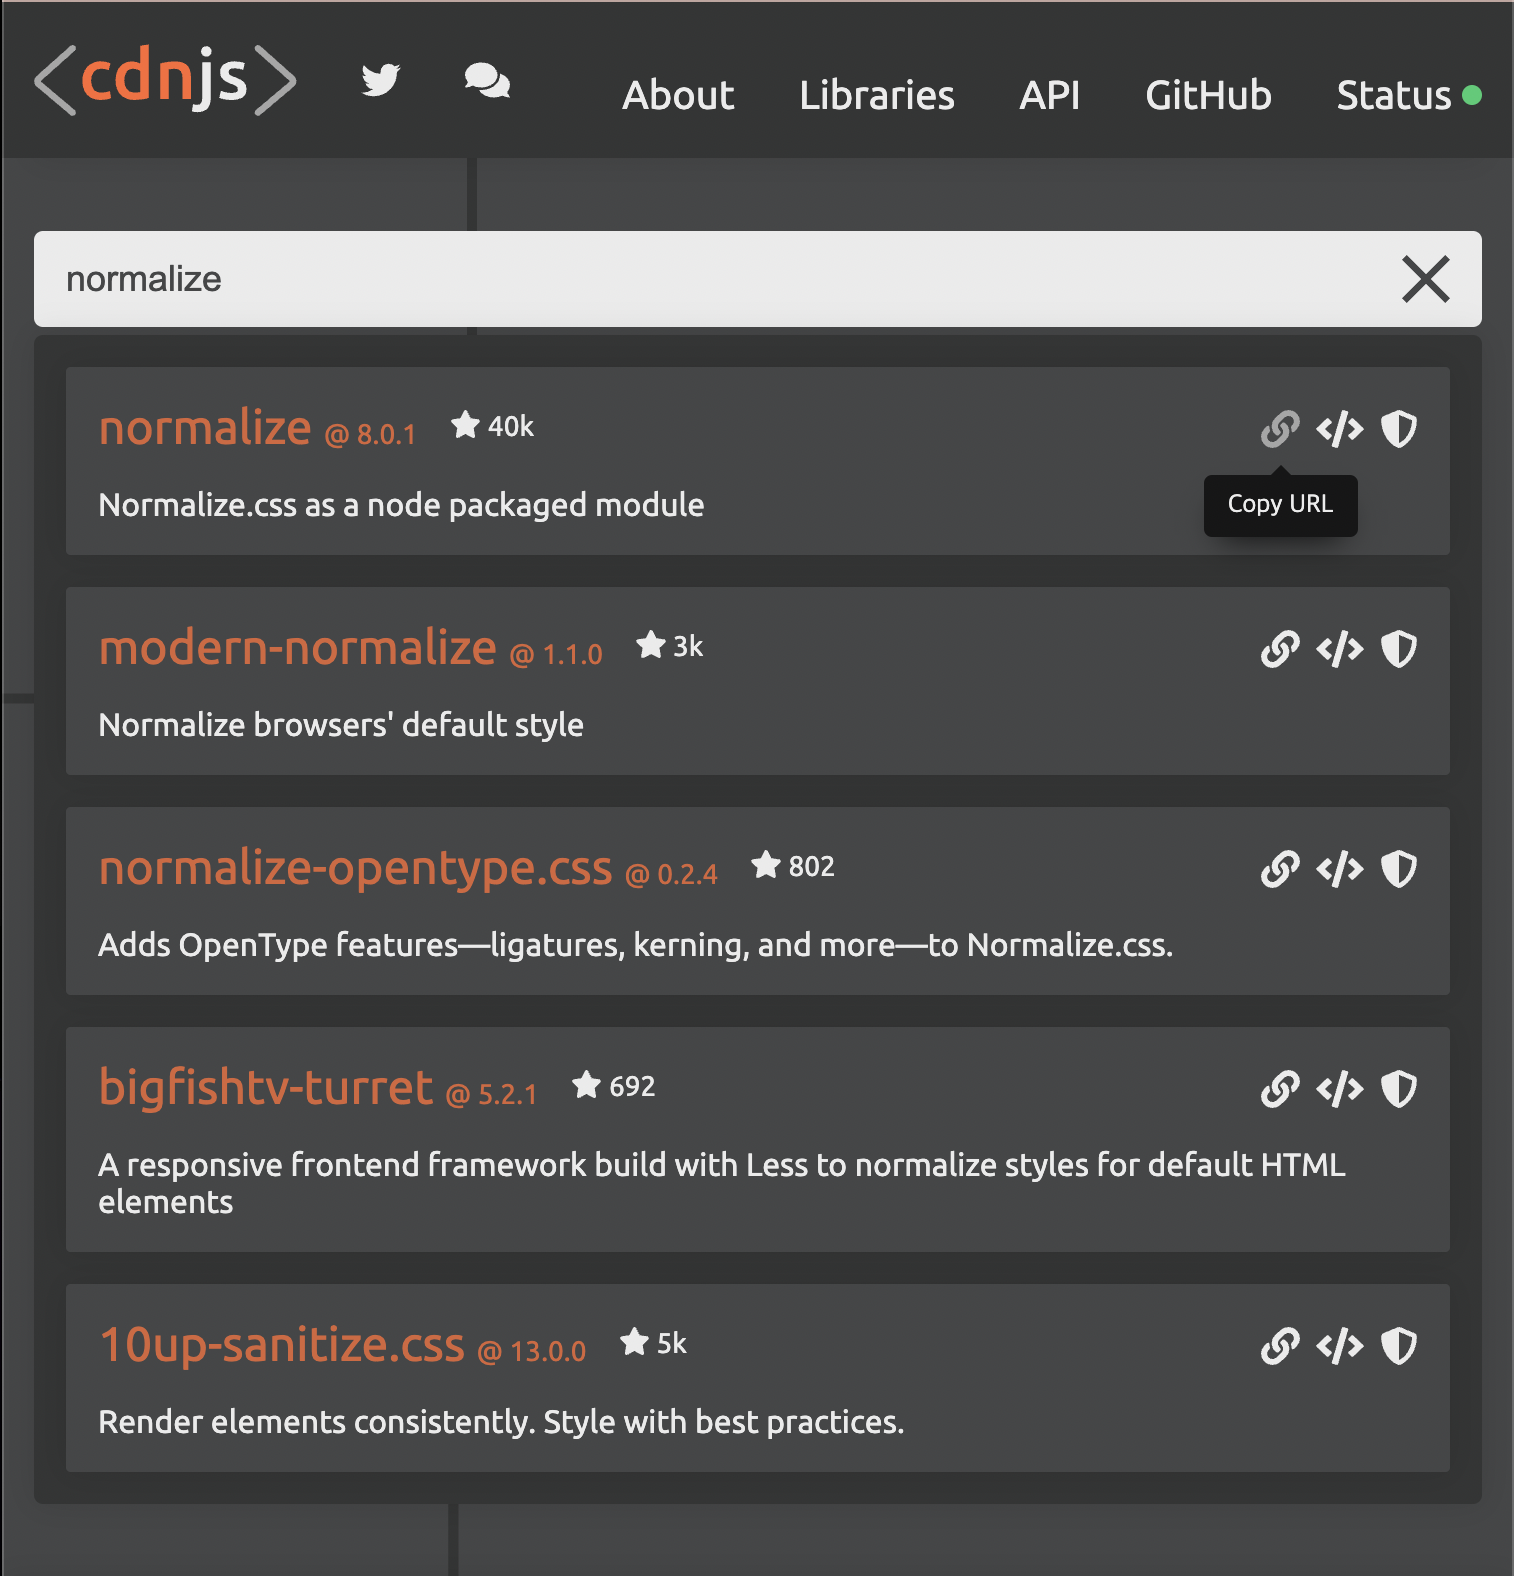
normalize를 검색하고 해당 링크를 복사한다.
play.html의 <link> 부분을 아래와 같이 수정한다.
    <link rel="stylesheet" type="text/css" href="https://cdnjs.cloudflare.com/ajax/libs/normalize/8.0.1/normalize.min.css"> <!-- 추가 -->
    <link rel="stylesheet" type="text/css" href="/css/play.css">
그러면 별도의 normalize.css파일 없이도 해당 파일의 내용을 적용할 수 있다.
댓글남기기