프로젝트 환경설정
이 포스트는 김영한님의 ‘스프링 입문 - 코드로 배우는 스프링 부트, 웹 MVC, DB 접근 기술’을 수강하고 작성하였습니다.
프로젝트 생성
라이브러리 살펴보기
gradle이나 maven과 같은 빌드 툴들은 의존 관계를 관리한다.
만약 내가 A라는 라이브러리만 필요하지만, A는 B라는 라이브러리에 의존하기 때문에 빌드 툴은 A와 B를 함께 빌드한다.
스프링 부트 라이브러리
- spring-boot-starter-web
- spring-boot-starter-tomcat: 톰캣 (웹 서버)
- spring-webmvc: 스프링 웹 MVC
- spring-boot-starter-thymeleaf: 타임리프 템플릿 엔진(View)
- spring-boot-starter(공통): 스프링 부트 + 스프링 코어 + 로깅
- spring-boot
- spring-core
- spring-boot-starter-logging
- logback, slf4j
- spring-boot
참고:
spring-boot-devtools라이브러리를 추가하면,html파일을 컴파일만 해도 서버 재시작 없이 View 파일 변경이 가능하다.
IntelliJ 컴파일: build > Recompile
테스트 라이브러리
- spring-boot-starter-test
- junit: 테스트 프레임워크
- mockito: 목 라이브러리
- assertj: 테스트 코드를 좀 더 편하게 작성하게 도와주는 라이브러리
- spring-test: 스프링 통합 테스트 지원
View 환경설정
정적 Welcome Page 만들기
src/resource/static/index.html을 생성하면, Welcome Page로 인식한다.
<!DOCTYPE html>
<html lang="en">
<head>
    <meta charset="UTF-8" http-equiv="Content-Type">
    <title>Hello</title>
</head>
<body>
Hello
<a href="/hello">hello</a>
</body>
</html>
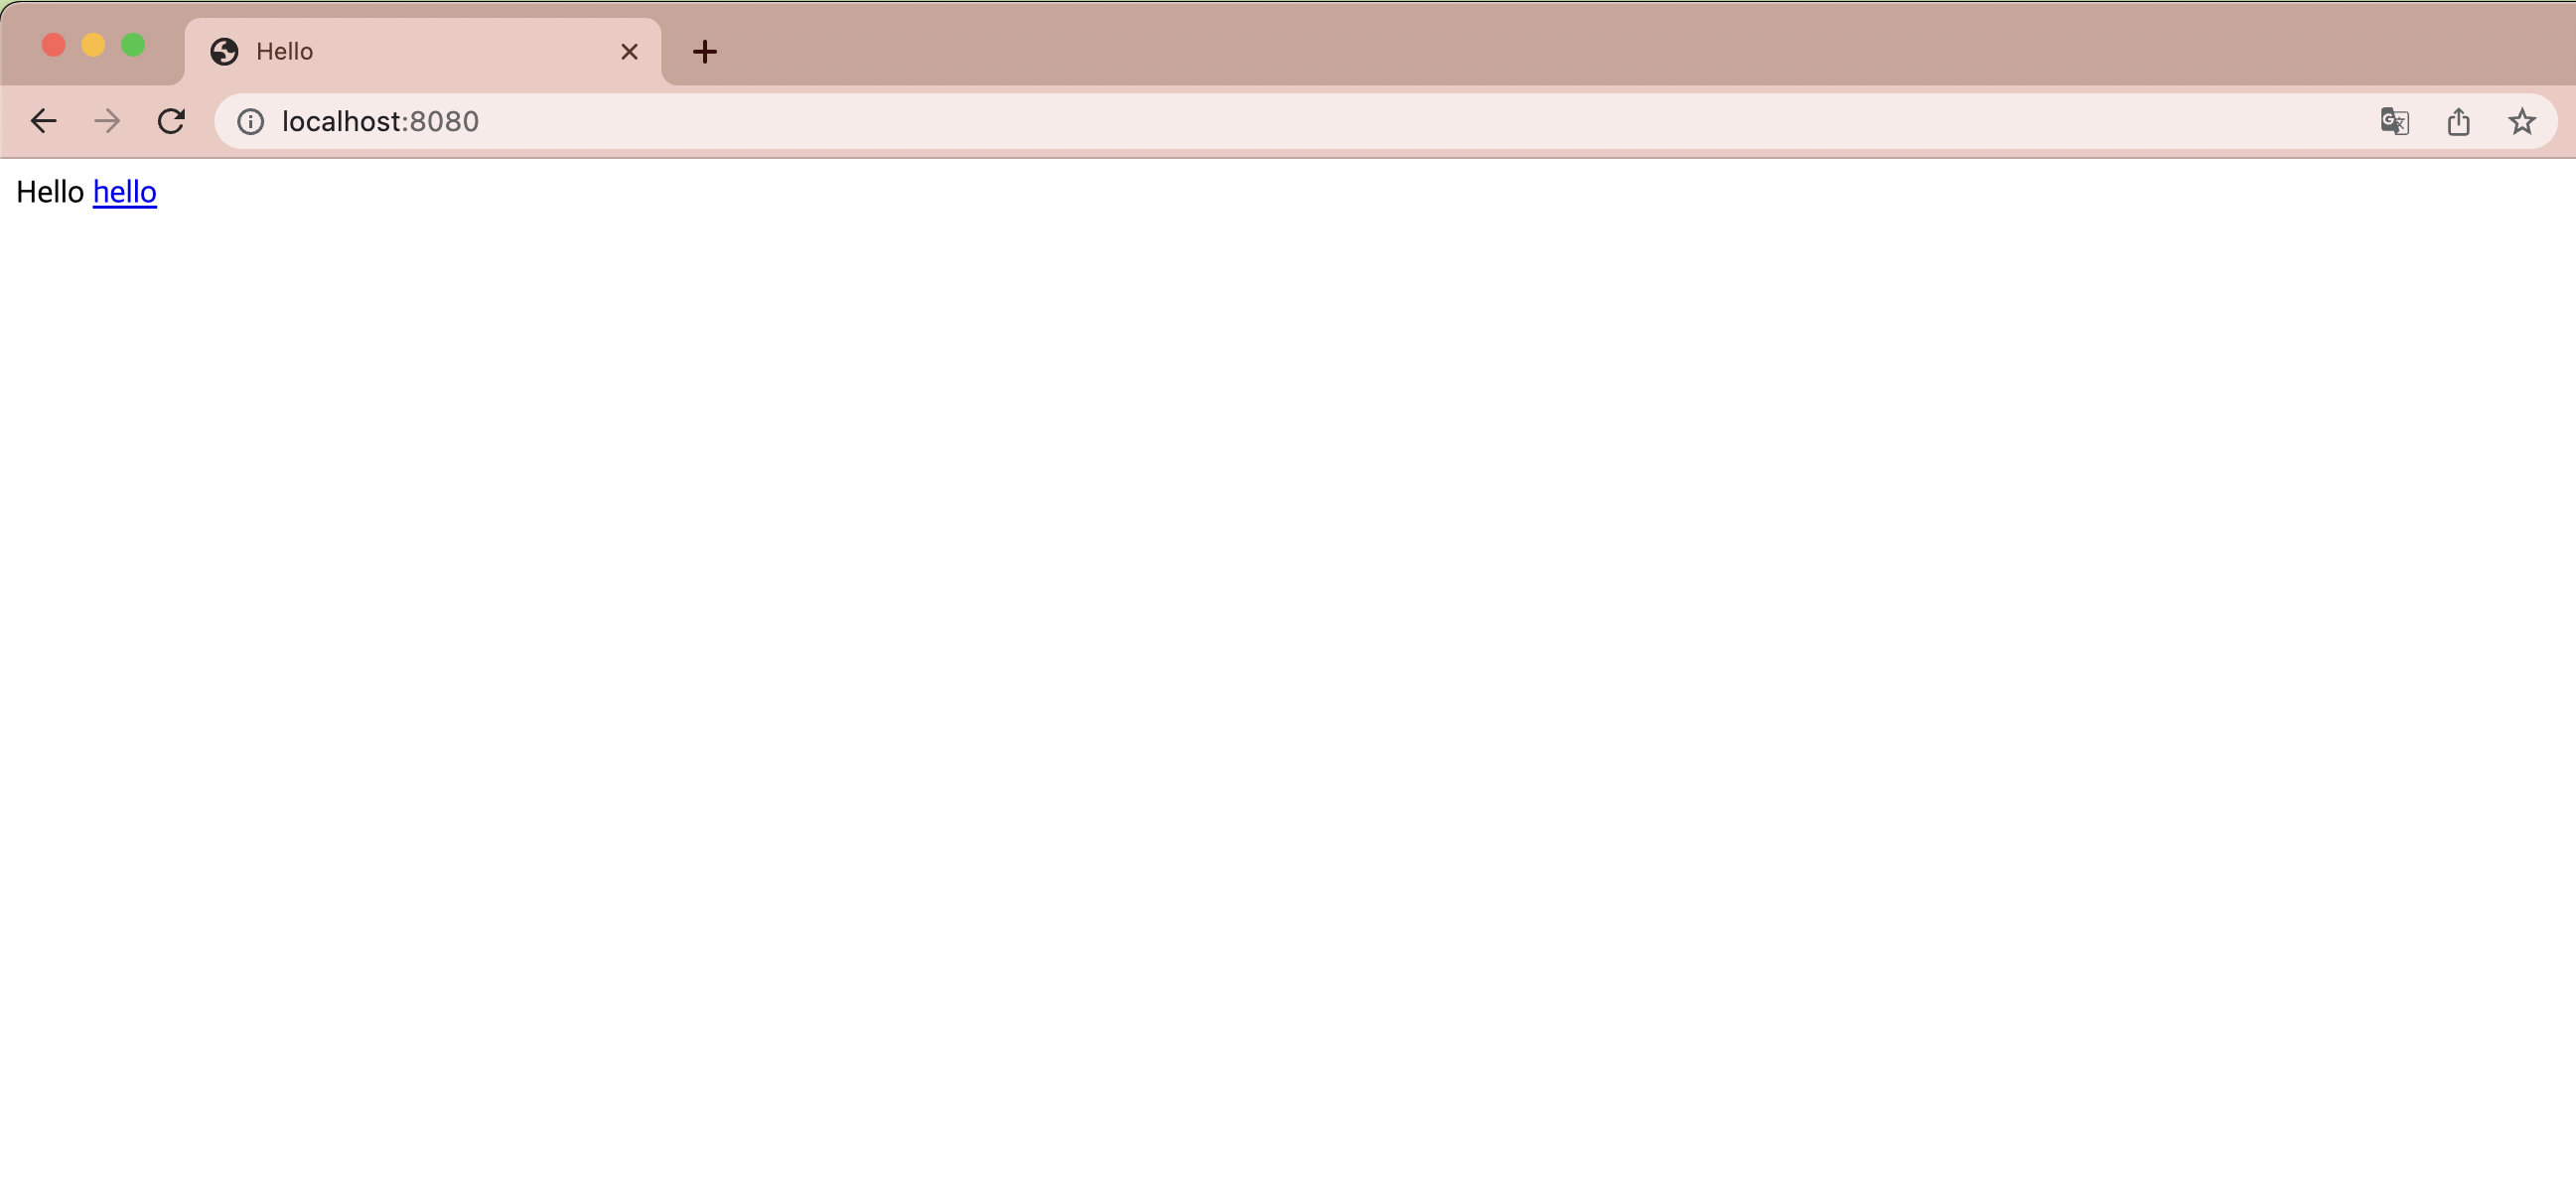
위의 파일을 만들고 실행해보자. 이후 localhost:8080에 접속하면

와 같은 화면이 나타날 것이다. 이는 웹 서버에 index.html 파일 자체를 넘겨주는 방식이다.
동적 Welcome Page 만들기
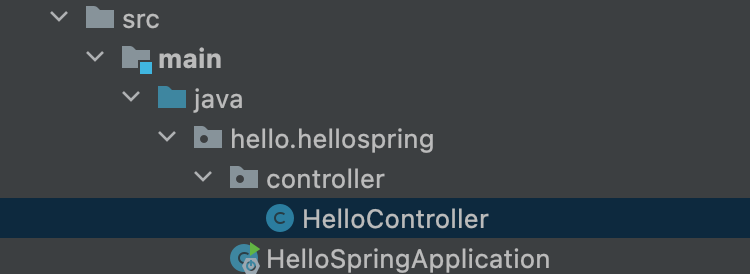
웹 어플리케이션에서의 첫 번째 진입점인 Controller를 만들어준다. 우선 src/main/java/hello.hellospring/controller 패키지를 생성한다. 그리고 그 패키지 안에 HelloController 클래스(이자 컨트롤러)를 생성한다.

그리고 src/main/java/hello.hellospring/controller/HelloController.java에 다음과 같이 입력한다.
package hello.hellospring.controller;

import org.springframework.stereotype.Controller;
import org.springframework.ui.Model;
import org.springframework.web.bind.annotation.GetMapping;

@Controller
public class HelloController {

    @GetMapping("hello")
    public String hello(Model model) {
        model.addAttribute("data", "hello :D");
        return "hello";
    }
}
@Controller: 스프링이 해당 클래스가 컨트롤러임을 인식하게 한다.@GetMapping: 웹 어플리케이션에서/ + 괄호 안의 문자열로 접속하면 해당 어노테이션의 메서드가 실행된다.Model: MVC(Model View Controller)의 Model. 속성을 추가할 수 있다.return "hello": 템플릿 엔진(thymeleaf)
그리고 /src/main/resources/templates/hello.html에 다음과 같이 입력한다.
<!DOCTYPE html>
<html xmlns:th="http://www.thymeleaf.org">
<head>
    <meta charset="UTF-8" http-equiv="Content-Type">
    <title>Hello</title>
</head>
<body>
<p th:text="'안녕하세요,' + ${data}"> 안녕하세요, 손님</p>
</body>
</html>
<html xmlns:th="http://www.thymeleaf.org">: thymeleaf 문법을 사용할 수 있게 한다.${data}:model의attribute중에data가 key인 값을 가져온다.
위의 두 파일을 만들고 서버를 다시 시작하면

와 같은 화면을 볼 수 있다. 원래라면 <p>태그 내에 있던 안녕하세요, 손님이 보여야 하지만, thymeleaf의 동작으로 th:text의 내용이 보인다.
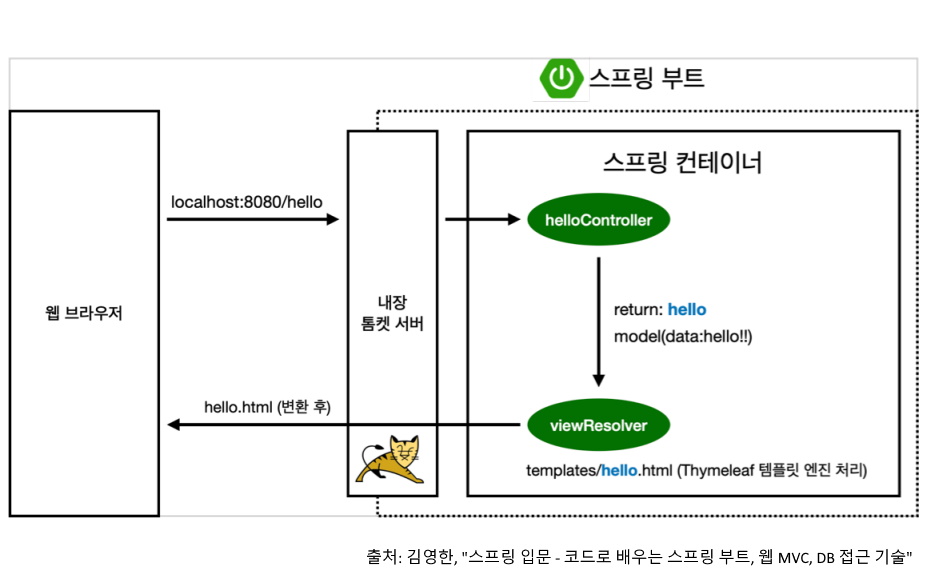
thymeleaf 템플릿 엔진 동작

- 웹 브라우저가
localhost:8080/hello를 요청한다. - 스프링 부트의 내장 서버인 톰캣은 요청을 받아서 스프링 컨테이너에 전달한다.
- 스프링 컨테이너에서는
@GetMapping("hello")를 통해hello(Model model)메서드를 실행한다. 이때 스프링이Model객체를 만들어서 넘겨준다.model에addAttribute()메서드로 데이터의 키-값을 추가한다.- 모든 동작이 끝나고
hello를 반환한다. - 컨트롤러에서 반환 값으로 문자열(hello)을 반환하면,
viewResolver가 화면을 찾아서 처리한다.- 스프링 부트 템플릿 엔진의 기본 viewName 매핑
resources:templates/{viewName}.html
에러: Web server failed to start. Port 8080 was already in use.
스프링 부트를 실행하려고 할 때 위와 같은 에러가 뜰 수도 있다. 이는 스프링 부트에서 서버를 띄울 때 8080 포트를 사용하려 하는데, 다른 곳에서 이미 8080 포트를 사용하고 있을 때 발생한다.
해결법은 이미 8080 포트를 사용하고 있는 프로세스를 kill 하면 된다.
~ ❯ lsof -i tcp:8080
COMMAND  PID    USER   FD   TYPE             DEVICE SIZE/OFF NODE NAME
java    7982 nayejin   53u  IPv6 0x3a92d570b10c8717      0t0  TCP *:http-alt (LISTEN)

~ ❯ kill -9 7982
출처: https://dundung.tistory.com/148
빌드
빌드를 할 때에는 빌드 할 프로젝트의 서버는 내려두고, 터미널에서 진행한다.
빌드 할 프로젝트의 폴더로 이동한다. 나의 경우, 현재 그 폴더에는
~/IdeaProjects/hello-spring ❯ ls
HELP.md         gradle          gradlew.bat     settings.gradle
build.gradle    gradlew         out             src
와 같은 폴더 및 파일들이 있다. 여기서 gradlew 를 이용하여 빌드를 할 건데, 명령어와 결과는 아래와 같다.
~/IdeaProjects/hello-spring ❯ ./gradlew build

BUILD SUCCESSFUL in 13s
7 actionable tasks: 7 executed
이후 프로젝트 폴더에는 build라는 폴더가 생성되어 있다.
~/IdeaProjects/hello-spring ❯ ls -l                                                                                 14s
total 48
-rw-r--r--   1 nayejin  staff  1248  3 11 18:33 HELP.md
drwxr-xr-x  10 nayejin  staff   320  3 16 22:17 build
-rw-r--r--   1 nayejin  staff   537  3 11 18:33 build.gradle
drwxr-xr-x   3 nayejin  staff    96  3 11 18:33 gradle
-rwxr-xr-x   1 nayejin  staff  8070  3 11 18:33 gradlew
-rw-r--r--   1 nayejin  staff  2763  3 11 18:33 gradlew.bat
drwxr-xr-x   3 nayejin  staff    96  3 11 18:54 out
-rw-r--r--   1 nayejin  staff    34  3 11 18:33 settings.gradle
drwxr-xr-x   4 nayejin  staff   128  3 11 18:33 src
build 폴더에는 여러 폴더들이 더 있는데, 그 중에 libs 폴더로 이동한다.
build/libs에는 .jar 파일이 있다.
~/IdeaProjects/hello-spring/build/libs ❯ ls -arlth
total 37248
-rw-r--r--   1 nayejin  staff    18M  3 16 22:17 hello-spring-0.0.1-SNAPSHOT.jar
drwxr-xr-x   4 nayejin  staff   128B  3 16 22:17 .
-rw-r--r--   1 nayejin  staff   2.4K  3 16 22:17 hello-spring-0.0.1-SNAPSHOT-plain.jar
drwxr-xr-x  10 nayejin  staff   320B  3 16 22:17 ..
참고:
ls -arlth명령어는 .을 포함한 모든 파일(a)을, 알파벳 역순으로(r), 자세한 내용을(l), 수정 시간 순서대로(t), 파일 크기 단위를 보여주는(h) 명령어이다.
강의와는 달랐던 점이 내 프로젝트에는 -plain.jar파일까지 있다는 것이었다. 그래서 plain.jar가 무엇인지 찾아봤다. 이는 Plain Archive 로, 어플리케이션 실행에 필요한 모든 의존성을 포함하지 않은, 즉 소스 코드의 클래스 파일과 리소스 파일만 포함하는 것이다. 반대로 -plain이 없는 파일은 Executable Archive 라고 해서 어플리케이션 실행에 필요한 모든 의존성을 포함한다. 그래서 빌드할 때 해당 파일을 이용할 것이다.
“어? 그러면 왜 만들었지?” 싶은데, 이건 인프런 커뮤니티에 질문해서 답이 오면 그때 업데이트 하겠다. (참고: https://dev-j.tistory.com/22)
어쨌든 그 중에서 hello-spring-0.0.1-SNAPSHOT.jar를 아래의 명령어로 실행한다.
~/IdeaProjects/hello-spring/build/libs ❯ java -jar hello-spring-0.0.1-SNAPSHOT.jar

  .   ____          _            __ _ _
 /\\ / ___'_ __ _ _(_)_ __  __ _ \ \ \ \
( ( )\___ | '_ | '_| | '_ \/ _` | \ \ \ \
 \\/  ___)| |_)| | | | | || (_| |  ) ) ) )
  '  |____| .__|_| |_|_| |_\__, | / / / /
 =========|_|==============|___/=/_/_/_/
 :: Spring Boot ::                (v2.6.4)

(이하 생략)
서버가 무사히 동작하는 것을 확인했으면, 다시 localhost:8080/hello에 접속해본다. 해당 페이지는 정상적으로 로드될 것이다.
그러면 만약에 빌드에 문제가 생기거나 원래 있던 빌드 파일 없애고 싶으면? 그럴 때엔 아래의 명령어를 실행한다.
~/IdeaProjects/hello-spring ❯ ./gradlew clean

BUILD SUCCESSFUL in 1s
1 actionable task: 1 executed

~/IdeaProjects/hello-spring ❯ ls
HELP.md         gradle          gradlew.bat     settings.gradle
build.gradle    gradlew         out             src
참고로 ./gradlew clean build를 하면 빌드 파일을 지웠다가 다시 생성한다.

댓글남기기